
Stuart Rodda on garden tools
Stuart Rodda is an avid gardener who lives in Eltham.
Large hand tools
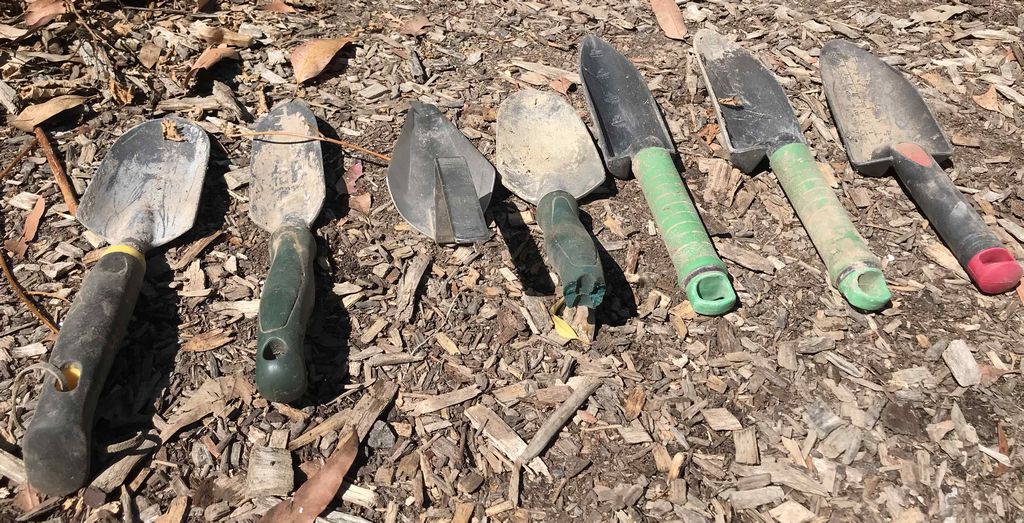
Shovels and spades
 |
 |
 |
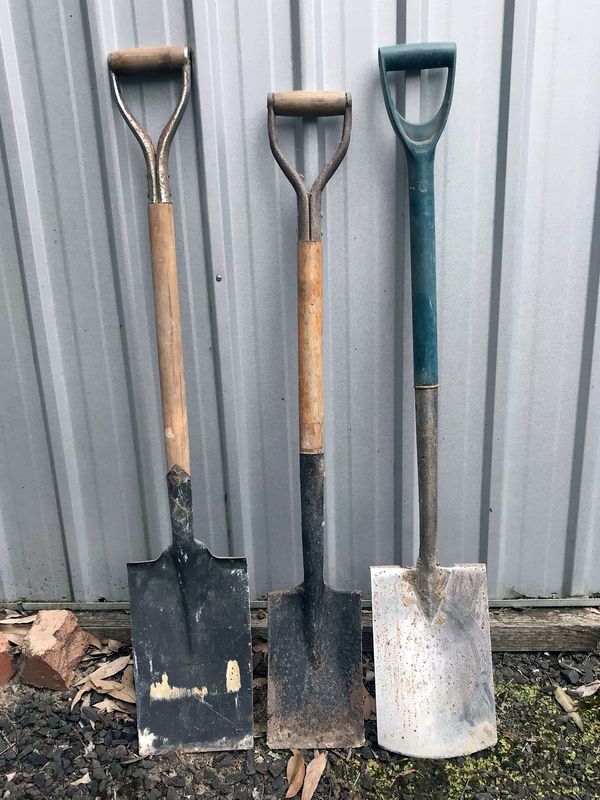
| Spades | Semi-pointed shovels | Square shovels |
To dig the earth, you need a tool and, for larger areas, a full size shovel, fork or hoe is essential. Even no-dig gardens sometimes need to be dug up to incorporate soil improvers or to re-shape the garden beds.
In this discussion, a shovel is defined as a tool with a fairly flat but contoured blade, which can be used to lift out a chunk of soil and turn it over.
Shovels will cut into the soil, allowing you to lift the chunk out in one action, whereas a fork pierces the soil with multiple tines (prongs) and will only lift out a chunk if the soil doesn’t break up when lifted. Forks work better on harder soils, or soils containing stones, which would stop the blade of a shovel from penetrating. Forks for digging like this can have flattened tines and are also called ‘spading’ forks. Shovels, because they cut the soil, are not as affected by the presence of plant roots and can be used to turn in a previous crop with less effort than using a fork.
A spade is a type of sharp edged shovel (see lefthand photo above) but its primary purpose is to cut in a straight line rather than to lift and turn the soil. A spade is usually used to make straight edges on lawns or garden beds and, because the blade may not be contoured, it can bend under strain, so I suggest not using one for general digging.
Shovels can also be used for quickly moving soil or other bulk materials from place to place, or mixing different components together, such as compost and soil.
I find the most useful type of shovel for general purpose use to be a semi-pointed type (see middle photo above). The shape of the shovel allows it to cut into the soil progressively rather than all at once which is the case with square shovels (see righthand photo above) and thus the semi-pointed type is easier to use.
Square shovels are better for moving or mixing loose materials, especially when the materials to be moved or mixed are on a hard flat surface such as a concrete path.
Your shovel can be long handled or short handled (the latter usually with a D-shaped handle for better control). With the long handle, you have plenty of leverage and reach, and it doesn’t matter how short or tall you are. Features to look for are: a robust contoured steel blade that won’t bend, buckle or crack when subjected to all your power; a folded top edge for your foot to bear down on, big enough to spread the force so you won’t damage your shoes or foot; a strong but lightweight handle, and a blade size appropriate to your strength and needs. Smaller blades require less effort but they take longer to get through the job. Wooden handles can be strong, but hardwood can be heavy, and cheaper wood may leave splinters in your hands. Hollow fibreglass or steel handles are also made but, in my experience, fiberglass is not as strong as a good wooden handle, and steel is too heavy. For a shorter shovel, I have found that plastic D handles tend to break, making the tool useless, so a steel framed D-handle is a better choice.
Soil is best dug when moist but not wet; the structure of very dry or wet soil is damaged by being worked with a shovel. If incorporating compost or other soil improvers, you can spread a layer over the soil before digging, so that it becomes more evenly mixed when turning the soil.
Before using a shovel to dig the garden, sharpen the cutting edge with a file as needed to make it easy for the shovel to penetrate the soil. New shovels may not have been sharpened sufficiently at the factory. Wear robust boots and use your weight with your foot on the top folded edge to force the blade deeply into the ground at a nearly vertical angle, then step back and pull the top of the handle to breakout the chunk of soil you are about to turn over. If the chunk remains as a single clod after turning you may want to smash down on it with the back of the blade, to fracture it to allow water and air to penetrate. Otherwise you can leave it for a couple of days to crumble naturally before you plant. You can pull out any old plants or weeds for recycling at this stage which will also help break up the clod.
Try not to walk on the dug soil as that tends to compact it, which is bad for soil structure. If you are planting straight away, you can spread a mulch (such as straw) to reduce drying out of the soil, but don’t over-water the broken soil as that again is bad for soil structure. When you are finished, scrape excess soil off the shovel blade and store in a dry place to prevent rusting.
Forks
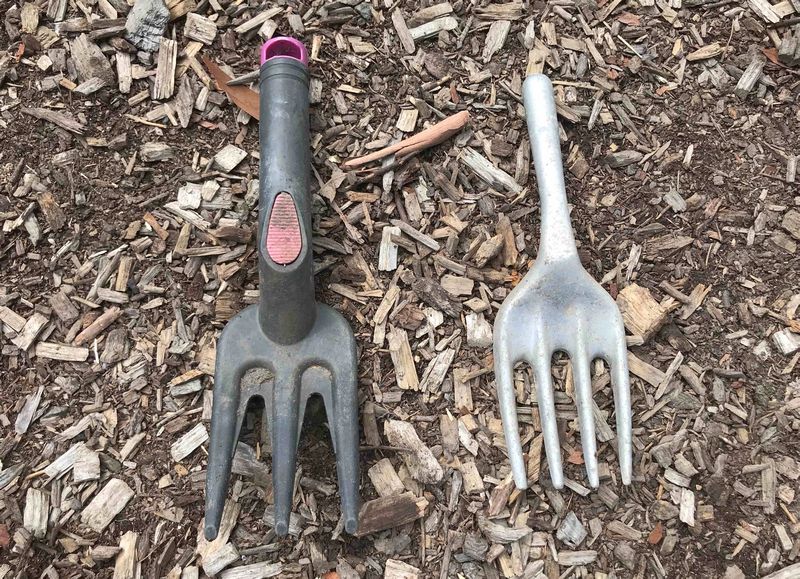
 A fork is defined here as a tool with multiple straight tines (prongs). They are usually used for digging soil, or for lifting loose bulk materials such as hay, mulch or compost, because the narrow tines penetrate these materials readily. The spacing between the tines determines how well a fork will retain loose material, i.e. if it will fall through the gaps when lifted. Sharper or tapered tines penetrate more easily than broad ones.
You would typically choose a ‘spading’ or digging fork rather than a shovel when digging previously worked soil such as a garden bed, and when you don’t want to cut your produce (carrots, potatoes) or worms in half. A fork is also a better initial choice when the soil is not moist, because the tines penetrate easier than a shovel. A fork is also an essential tool for turning compost due to the difficulty of driving a shovel into such a mixture. Finally, ‘lifting’ root crops is best done with a fork by digging underneath the roots to be harvested and letting the soil fall through the tines.
Your fork can be long handled or short handled (the latter usually with a D-shaped handle for better control) (see photo). With the long handle, you have plenty of leverage and reach, and it doesn’t matter how short or tall you are. Smaller forks require less effort but they take longer to get through the 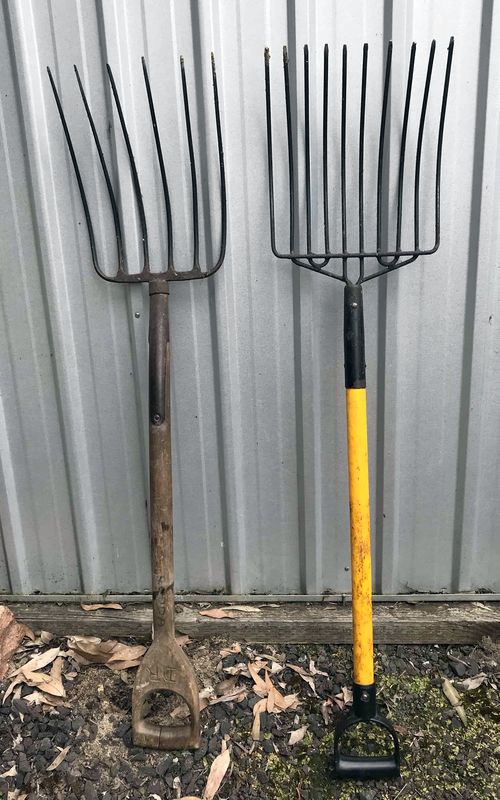 job.
job.
Features to look for when buying a fork include: tines which are strong and springy or hardened so they won’t bend under your force; a strong but lightweight handle; and an overall size appropriate to your job. Sharp pointed tips on the tines give good penetration but can be hazardous for unprotected feet. A digging fork ideally has the tines emerging from a horizontal ‘frame’ so that you can use your weight through your foot to drive the tines into the soil. Wooden handles can be strong, but hardwood can be heavy, and cheaper wood may leave splinters in your hands. Hollow fibreglass and steel handles are also made.
Specialised forks for hay, manure or mulch have smooth and tapered tines which slide easily into and out of the material being moved (see photo). A cheaper mulch fork with tines looking like thick wire works well on coarse mulch, and doubles as a rather crude rake for levelling your mulch layer after placing. Forks with sharp pointed tines can be a nuisance for moving mulch when the tines are constantly ‘spearing’ pieces of mulch.
Rakes
 A rake is defined here is a tool with many tines at approx. 90 degrees to the handle. The rake is one of the oldest traditional soil working tools and is used with a pulling action to move soil or gather loose material such as plant debris from the surface of the soil.
Every garden needs a rake as it greatly reduces the amount of work picking up leaves or broken bits of plants, and has a secondary use to help level and smooth the surface of rough soil. A strong rake with a flat back is best for the latter purpose, although a soil leveller may be better for final smoothing.
Rakes come in many sizes and modes of construction, for example the one-piece forged rake with a flat back, or the ‘nail’ rake where each tine is individually attached to a crossbar. For raking up light material such as leaves or grass, a many-tined plastic or springy metal rake is best.
To get through raking jobs quickly, choose a wide rake, but if your garden is small with lots of odd corners, a small rake will be better for you. A rake with flexible teeth is best for raking on hard surfaces or surfaces with projecting plant remnants, and for ‘raking up’ cut grass. A mulch fork held close to vertical also makes a useful rake for quickly clearing deeper layers of plant debris before finer raking of the soil surface.
Take care when putting a rake down between uses not to have the tines facing upwards, as the handle may come flying up at you if you stand on the tines.
Hoes
 A hoe is defined here as a tool with a blade at approx. 90 degrees to the handle. The hoe is one of the oldest traditional soil working tools and is used with a swinging or pulling action rather than being pushed or lifted like shovels and forks.
‘Digging’ hoes are usually used for broad scale digging, breaking up or moving soil, whilst ‘chipping’ hoes are used for chipping plants such as weeds out of the soil by cutting though the plants near the soil surface. In modern gardening, hoes are used more for chipping rather than heavy duty digging because a shovel or fork is more adaptable to different soil conditions. I find that a hoe is excellent for chopping off plants which have big root systems, such as overgrown silverbeet or parsley, or vigorous weeds. Also, you need a fair amount of space to swing a hoe for digging, whereas a shovel or fork can be deployed into tight corners and between precious plants.
Hoes are usually long handled because they use leverage on the handle to break the soil, or to pull the blade toward you, rather than for lifting a clod of soil clear of the ground like a short handled shovel or fork.
Features to look for include: a steel blade which is strong and springy so it won’t bend under your force; a strong split-resistant handle; and an overall size appropriate to your job. A sharpened cutting edge gives good soil penetration or chipping effectiveness but can be hazardous for feet or fingers.
Traditional hoes have wooden handles which need to be made from a strong timber to withstand leverage. A heavy hardwood handle can assist with soil penetration when digging because of the momentum the wood gets from your swinging action, but a lighter handle is better if you only want to chip out weeds.
Mattocks
 A mattock is defined here as a digging tool with a heavy blade at approx. 90 degrees to the handle. Heavier than a garden hoe and similar to a pick but with a wider blade, a mattock is one of the most effective hand tools for digging into hard or rocky ground. It has stood the test of time, such as digging for gold during the gold rush or for digging into the subsoil to make a trench or plant a tree. One side of the head is the main blade while the other side can be in the shape of a pick or an axe.
Mattocks are usually used for breaking up, or moving, previously unworked ground. They are used with a full arm swinging action to make the most of their momentum as they hit the ground. Whilst some people use them for cutting through tree roots, I have found that a sharp axe is easier to use for that purpose because the axe blade is in line with the arc of your swinging blow rather than at 90 degrees to it. So, mattocks with an axe-like blade on the opposite side to the main blade allow you to tackle multiple needs with the one tool.
Mattocks are usually short handled because the head is too heavy to lift otherwise. Because they are used more to break the soil, rather than lifting up a clod, another tool such as a shovel is then used to move the broken ground.
Features to look for include: a thick blade around 10 to 12 cm wide at the tip, which is strong and made from steel which will hold a sharp edge; a strong handle; and an overall size/weight appropriate to your strength and the job. A sharpened blade edge gives good soil penetration but can be hazardous for feet or fingers. It is a good idea to wear safety glasses when using a mattock as stones, soil or bits of tree root can fly into your eyes.
Mattocks traditionally had wooden handles, which need to be made from a strong hardwood to withstand leverage. Fitting a mattock head securely to a wooden handle can be difficult because of the need for a precise taper of the wood, the constant loosening effect of pounding into hard soil or rock and the shrinkage of wood as it dries out. I have found that mattocks with a solid fibreglass handle are more durable and secure, although you do get a certain amount of jarring back through a fiberglass handle which can be minimised by wearing gloves.
Soil levellers
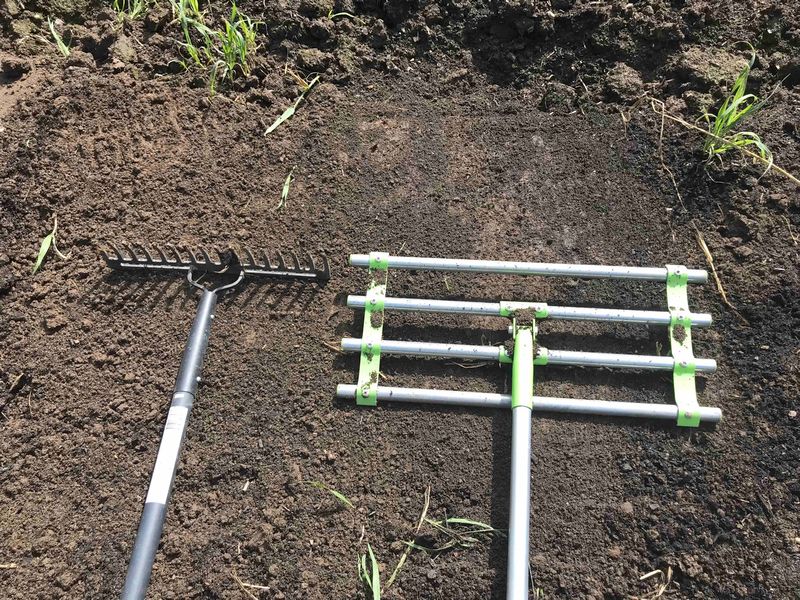 For decades, I have been flattening soil to make planting beds using the back of a rake or a straight piece of wood. However, for other reasons (namely, to create a flat surface for a gravel path), I recently acquired a soil leveller from Bunnings. Having that tool, I then tried using it to create a flat soil bed for planting out seedlings and it worked brilliantly, so now I use it all the time for that purpose.
Why is it better than the flat back of a rake? (See the photo of the both of them.)
- It is heavier and more ‘self-levelling’.
- With 4 rounded bars joined together, it easily moves away lumps of soil while flattening out the fine soil, and also tends to break lumps into smaller crumbs.
- It is wider.
- There are fewer holes left behind where slugs etc can hide and come out at night to chomp any seedlings or emerging shoots.
- It is cheap ($19).
For a small home garden it may not be worth having this extra tool but for a larger veggie patch or community garden I highly recommend it.
Hand-operated cutting tools
Secateurs (pruners)
Secateurs (aka pruners), a tool designed for use with one hand, come in many shapes, sizes and prices. The most familiar are the bypass pruners many people use to remove unwanted parts of their plants, such as for shaping and annual maintenance pruning of shrubs and trees, or harvesting fruit. Choosing the right secateurs can make a big difference to the difficulty or ease of a pruning job. Because secateurs are for one-handed operation, stem diameters above 2.5cm (or wood that is hard) may require you to use a saw. (Saws will be covered in a separate article.)
Secateurs can be classified according to whether the cutting blade slides past the solid blade (‘bypass’ type, with a scissor-like action) or comes down hard onto the solid blade (‘anvil’ type). Bypass pruners are more popular as they tend to do less damage to the stem and make a cleaner cut. The hinge mechanism can also vary from a simple bolt to an adjustable tightness locking bolt, or even a ratcheting lever.
When buying, look for:
- Light weight to prevent fatigue when making many cuts. Aluminium alloy is non-rusting and keeps the weight down but a strong, quality steel cutting blade is essential and should be kept sharp.
- Smooth action, such as from a Teflon coated cutting blade and easy hinge lubrication.
- A locking catch.
- A reliable return spring.
- Hand grips which are contoured and non-slip.
- Robustness so the tool will last a lifetime – a tool which rusts or corrodes easily is no bargain.
Expect to pay around $20 for a good pair or many times that for a ‘name’ brand.
 In the photo you can see three small secateurs: the classic orange Felco Swiss ones (very simple and reliable but very expensive); a cheap green pair from Aldi (with a Teflon coated blade, a unique hand guard and rotating ergonomic handle); and a very cheap unbranded pair (similar in design to the Felco but heavier and prone to corrosion).
To use bypass secateurs, ensure the tool is oiled, the blade sharp, and the hinge is tight enough to ensure a proper scissor action (i.e. the cutting blade will slide tightly past the solid blade during the cut). Try to cut with the blade on the main stem side of the cut, to avoid bruising the wood which is to remain on the plant. If you are right handed, this can be achieved by keeping the main stem on your right as you work around the plant. Cut close to a bud or the main stem so that the remaining stub will not end up as a piece of dead wood, which can be a source of wood rot. Keep your fingers away from the blade when cutting and try not to twist the tool, which could damage the both the blade and the plant. Clean the secateurs after use so that they will not transmit disease and will be ready for next time.
Loppers
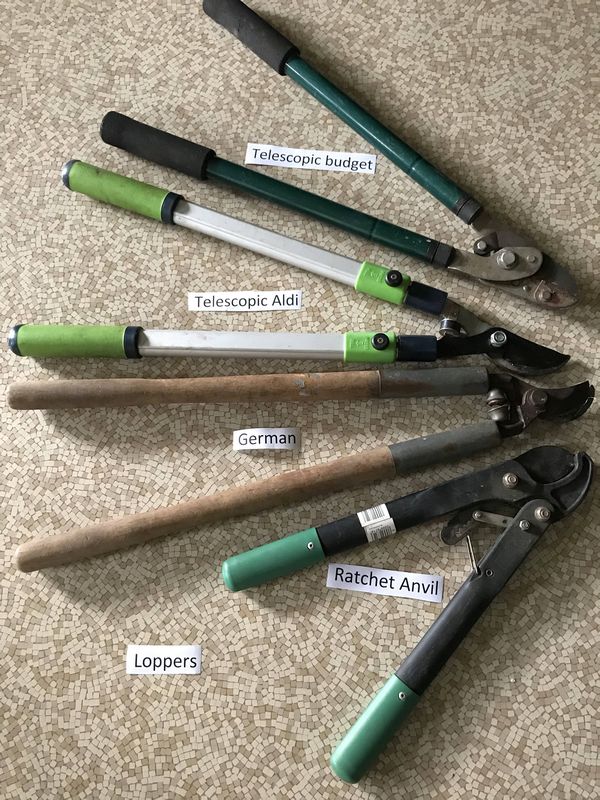
 The leverage from the longer handles, and two-handed operation of loppers, allows much greater force to be applied to the wood than with secateurs and therefore wood of greater diameter can be cut, up to around 4cm.
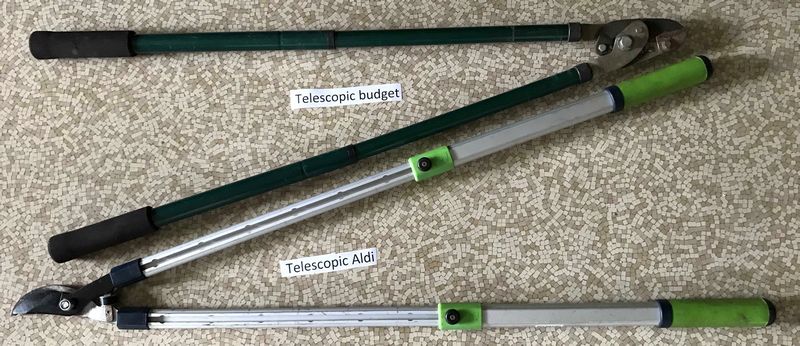
The four loppers shown in the photo far right are: a simple German wooden handled model (extremely strong, light and effective); a smaller green plastic lever/ratchet anvil type; and two models with extending handles which make it easy to prune branches out of arm’s reach. The left hand photo then shows the two extendable models in their extended positions.
The most versatile of these four loppers is the Aldi model, which has sliding aluminium arms incorporating a push-button locking system for extending the arms from around 60cm up to 1.2m, which, in turn, give extra reach and also extra leverage for cutting branches up to about 4cm diameter.
Pole loppers
To cut small branches off higher limbs of trees you can use a pole lopper, where the cutting blade is mounted on one end of the pole and the operating handle on the other. The transfer of force from the operating handle to the blade can be via a steel rod, a rope, or a plastic band.
 The photo shows the three types:
- A heavy green steel model, fixed length, with a hook/blade at the cutting end, using a lever connected to a steel pulling rod to exert maximum cutting force. This design has the advantage that the hooked end can be placed on the branch and will not slip while you concentrate on pulling the lever.
- A grey steel tube model, extendable in length and locked at the chosen length with a twisting motion, using a white plastic rope which pulls the cutting blade. Pole loppers operated by rope have the huge disadvantage that the rope tends to get caught in branches or twisted around the pole in use.
- A square extendable aluminium tube model from Aldi which uses flat plastic bands to transfer the pulling force part way along the outside of the tube, and an internal steel cable to operate the cutting blade. This design prevents snagging of the external pulling band or internal cable. The Aldi model can extend to around 3m in length, avoiding the need to climb on a ladder to reach the top of small trees for pruning. This is by far the best design due to its light weight and versatility. It is an Aldi special which means it only becomes available occasionally (but similar models exist at Bunnings at higher prices).
For the cutting of larger diameter wood from ground level in hard-to-reach places and at greater heights, saws, including pole-mounted chainsaws, offer a cheap and convenient alternative to hiring a professional arborist. (Saws will be covered in a separate article.)
Mini chainsaws
|
I have always cut small branches of 3-8cm diameter with a hand saw or, sometimes, with one of my chainsaws. Wood of this size is too large for my long handled loppers, and a full size chainsaw is a bit of overkill, plus inherently dangerous. However, a mini one-handed battery chainsaw does the job in a fraction of the time with almost no effort and seems safer than the alternatives, even safer than a bow saw or a pruning saw with their exposed sharp teeth. The video right shows me using a ‘4 inch’ mini chainsaw to cut a small tree. The supplier claims that they do not need lubrication but I have found . that silicone spray on the chain makes the tool work better and will probably give you longer life (less wear). They come with two lithium batteries, so one can be charging while the other is in use. Due to their small size, they are light in weight and good for cutting in a confined space or close to a trunk, and are unlikely to kick back like a larger chainsaw can. I chose one with a protective top guard just in case. Naturally your other hand needs to be well clear of the moving chain. Being battery powered they always start instantly and don’t have a power lead like a mains-powered tool. They are available in various brands, for example the one I have was $70 (delivered) through eBay from a local supplier. They can also be fun to use and you don’t need to put off those larger pruning jobs for another day! |
 |
Hand saws
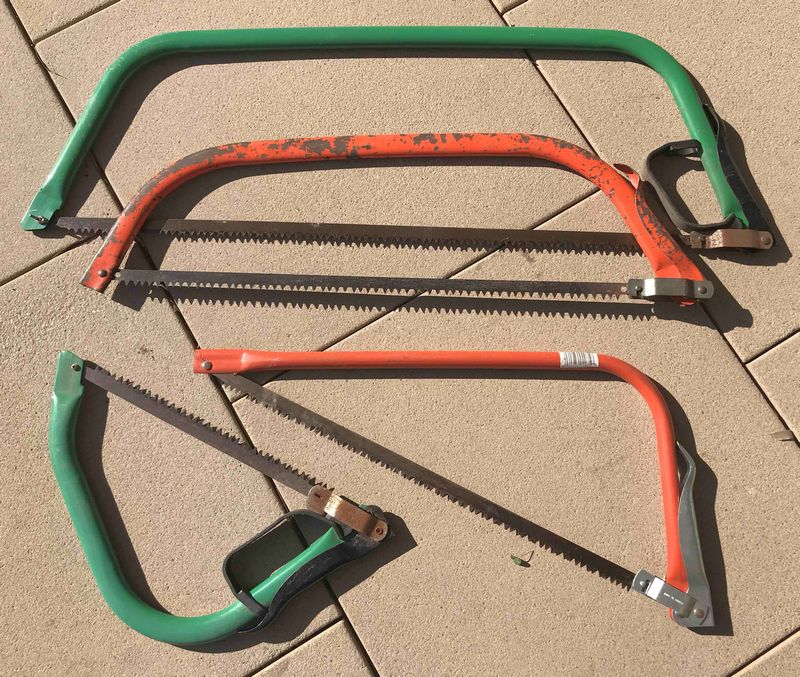 The multiple cutting teeth of saws make short work of all kinds of woody plants which are too large or too tough for secateurs or loppers. Different types include straight saws, curved saws including those with backward cutting teeth, and bow saws.
Bow saws (see photo) usually have a thinner, longer blade because the ‘bow’ provides the rigidity needed to prevent bending of the blade, and they cut efficiently on both the pulling and pushing stroke. In my experience, the Jack’ brand is high quality and long lasting but there are other premium brands such as Fiskars and Stanley.
Chainsaws are a labour saving enhancement and, despite their dangers, can be useful even in a small backyard. The availability of mains-powered electric chainsaws, and the development of powerful lithium batteries for use away from mains power, mean that you don’t have to be skilled with petrol motor-powered tools to have your own  chainsaw(s).
As with any tool with sharp edges, saws must be treated with care and respect. Wearing gloves for hand protection is a must.
Always buy quality saws and you will not end up with a tool requiring constant sharpening or where the blade bends easily or rusts quickly. A blunt blade on a bow saw can be replaced easily whereas other saws may need total replacement or sharpening as they become blunt. Never allow the teeth of the saw to come in contact with anything harder than wood, such as metal (wire, nails) or stone (gravel or sand). Saws with backward cutting teeth allow you to cut by pulling the saw towards yourself, reducing the chance of the blade bending, or you slipping onto the saw teeth, or getting the saw jammed in the wood.
When cutting larger diameter wood, try to cut from the side which is under tension (e.g. the top of a branch) so that the cut tends to open up as you go, rather than closing and grabbing the saw blade. Undercut the branch a little before cutting through from the top, to prevent a ragged break in the branch or a strip of bark being pulled off the tree when the branch breaks.
A fine-toothed saw will always give you a cleaner cut and sometimes it may be best to cut off the bulk of a large branch with a coarse saw, then trim the cut stub with a finer saw. As with all pruning, cut close to the trunk so as not to leave a stub which will die and be a site for disease to enter the tree. Make sure your saw is clean and dry before storing it for the next time you will use it.
Knives
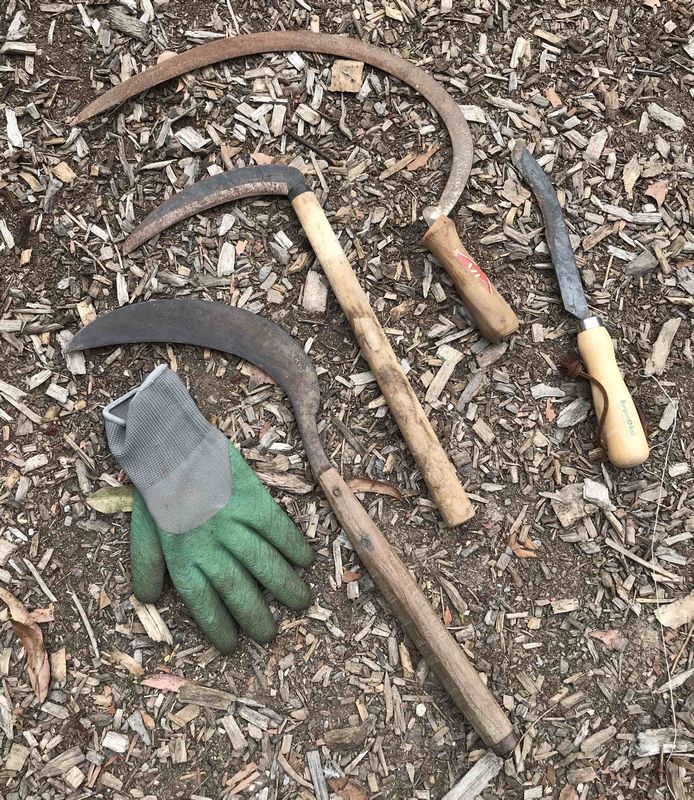
 Often the quickest way of cutting plants is with a sharp blade or knife rather than the more elaborate secateurs, shears, etc. For small soft plants, that may be a small kitchen knife or, for larger tougher plants, it may be a specialised tool such as a hook or scythe, or even a machete. The photo shows examples of all these tools.
A small kitchen knife kept in the garden can be used to harvest and trim vegetables before bringing them to the kitchen; the trimmings can go straight into the compost bin.
A larger knife, such as a curved ‘hook’, is great for rapid slashing of overgrown weeds or unwanted plants before digging in the remnants to enrich the organic content of the soil. A hook is also strong and sharp enough for removing vines, brambles and the smaller branches of shrubs or trees.
Another large knife is a machete. With its extra weight and size, I find that it is great for cutting up large pumpkins in the garden before bringing them inside for trimming, which reduces the risk of accidentally cutting yourself when trying to cut through a large pumpkin on a benchtop.
Finally, an asparagus cutter is a specialised harvesting knife designed for cutting off the asparagus spears below soil level.
Knives should be kept sharp with a file or sharpening stone and used with care when in use, such as by wearing sturdy gloves.
Small hand tools
Hands are great ‘tools’ but are so much more effective with the right gardening tool in them. To dig holes, make furrows, remove weeds, turn over soil, etc, a huge variety of tools have been invented (I have most of them!). However, some are too specialised, don’t work so well or break easily, so I am mentioning a few of my favourites which I use all the time and recommend for someone starting out.
My favourite small hand tools

 To keep the number of small hand tools to a minimum, I have whittled down a long list to just four tools which cover most small scale soil–related activities in the garden: a ‘rake’, a ‘trowel’, a bulb planter and a (stainless steel) delta hoe.
Tom Danby adds: “I want to add another fabulous tool. This was handmade as a fundraiser by Karen (ex Myanmar) refugees to a traditional shape. The small (15cm) plough head sits under your hand pointing back towards you – the combination of point, flat edge, and sharp rounded edge makes this a universal digging, spreading, cutting, and trenching tool. I rarely need anything else (and it hangs up out of the way too).”
Digging toolsDigging tools are small shovel-like tools for digging out plants/weeds or transplanting. They can be plastic, steel or aluminium, with or without a secure contoured hand grip. My favourite is a solid alloy tool with a rounded grippy handle. Being alloy, it won’t rust (like steel) or snap or break down in sunlight (like plastic), is light in weight and can be used for long periods without giving you blisters. Wooden handles are ok but many eventually split or rot, depending on quality, so I prefer a rubberised moulded handle. |
 |
Weeding toolsWeeding tools are used for cutting off weeds or hooking them out of the soil. Many are multi-pronged or have flat blades or a variety of other shapes. My favourite is the V-shaped delta hoe (e.g. see www.forestrytools.com.au/index.php?id=1189) and I have recently acquired a stainless steel one, Japanese made, much better quality than my old steel one. It has a sharp point and sharp edges on both sides so it can quickly shear off weeds at or below ground level or hook the tough ones out of the soil. It is best used with gloves on, though it is not dangerously sharp in adult hands. It is similar in concept to the ‘Ho-Mi’ Korean tool (e.g. see www.deepgreenpermaculture.com/2019/04/26/product-review-ryset-ho-mi-asian-hand-cultivator). |
 |
Forks and rakesIt is debatable whether a hand fork is necessary if you have a trowel already along with a multipurpose tool like the delta hoe. Small hand forks serve a similar purpose to regular forks. Thus with straight-tined (aka straight-pronged) hand forks, you can dig with downward pressure to the length of the tines or more, and the tines (aka prongs) penetrate hard soil better than a trowel. For deeper cultivation, a full size fork would be better. |
 |
|
A similar hand tool is like a small rake, with down-pointing tips, which enables you to rake across the top of the soil, or press down while raking, to dig the soil to a depth of 10 cm or so with multiple strokes. These are great for roughing up the soil surface to kill small weeds and increase water and air penetration; do this when the soil is fairly dry and just before mulching and watering. As with trowels, a solid aluminium/alloy model is light in weight and should not break, rust or be affected by sunlight; and a molded rubberised handle will give the greatest comfort. Stainless steel is also ok but I find that these are often flimsy and will bend or the welds will break under hard use. |
 |
A hookA hook is a tool with a curved blade which can be used for slashing down vegetation, pruning, or harvesting leafy greens. It is like a small scythe and is far quicker than using secateurs, plus it keeps your hands away from prickles or other plant defences. Some care is needed not to cut yourself. |
 |
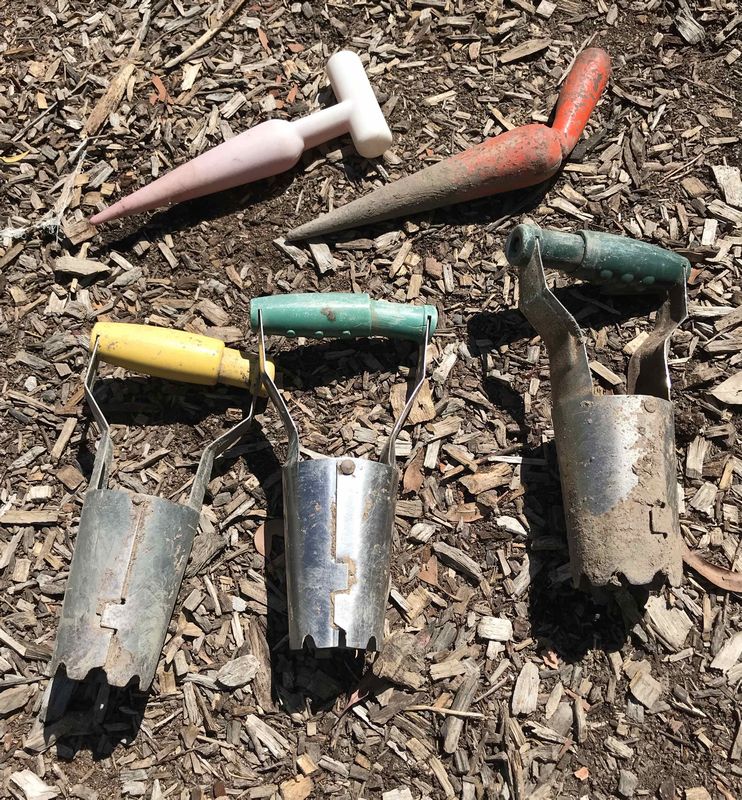
A bulb planterA bulb planter is the fastest and cleanest way to make a hole in the soil to put in a new plant or bulb. It simultaneously digs into the soil and removes a plug of soil ready to receive the seedling, then allows you to drop that soil and push it back around the new plant. This is because it is hinged to open and allow the soil to fall out of the planter. Get a stainless steel one because rust on a cheaper one will allow the soil to stick to it and not fall out easily when the handle is squeezed. |
 |
The humble teaspoon (by Amanda Coombes)Apart from the obvious (stirring a cuppa, or measuring bicarb or Epsom salts), the teaspoon has a myriad of uses in the garden. I love it because it helps me gently remove seedlings that I have propagated without damaging the delicate roots. For me, it is the perfect size. |
 |
 Not-so-small hand tools
A flamethrower
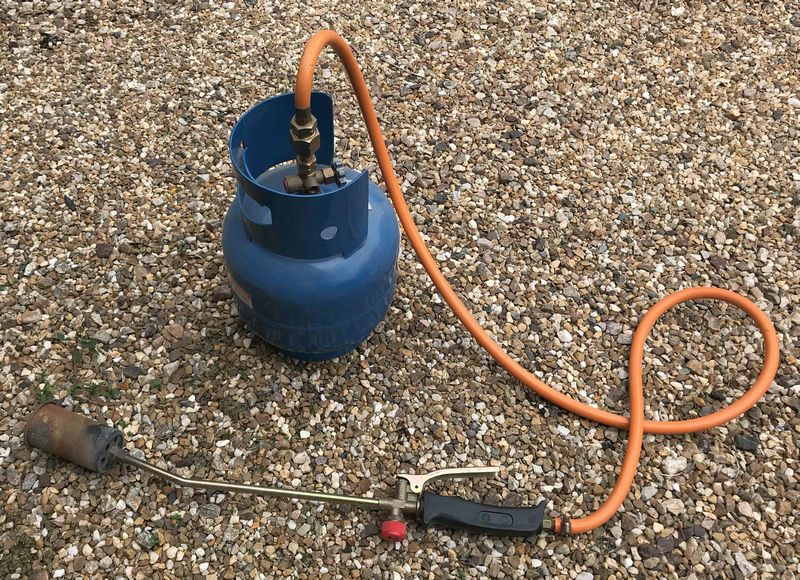
As drastic as it sounds, a flamethrower can be used safely to quickly kill weeds without using nasty chemicals, and also destroy any seeds which the weedy plants have already made before they can fall to the ground and continue the cycle. If you can, use an existing LPG cylinder. Cheap flamethrowers are around $50 and you can cover a large area quite quickly. This tool is not for the normal small home garden!
A power planter
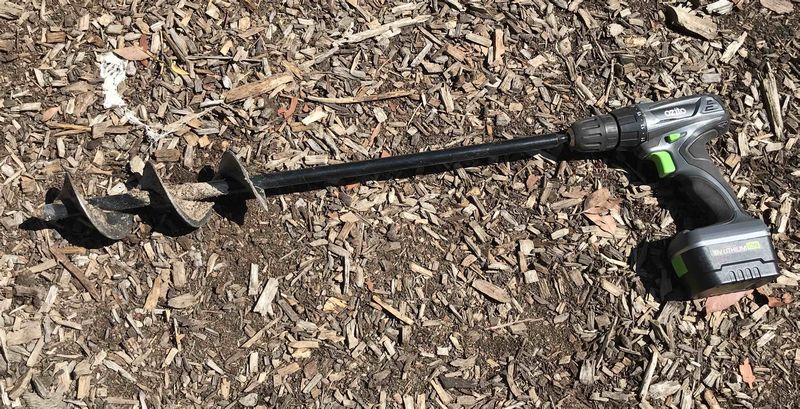 Power planters are an auger-like digging tool for quickly making planting holes and are powered by an ordinary battery drill. You can dig many holes in a few minutes, including going deeper than most hand tools, to provide an easy growth path for roots plus the soil is broken up and piled around the hole ready to be packed back in around the plant. Also, they are fun to use! A robust version costs only $20 from Kogan (auger only, you supply the drill!) or you can buy one from specialist suppliers for upwards of $70. One drawback – if you hit a stone under the soil surface, there can be a strong kickback through your hands/wrist so be careful!
Seed dispensers
 Question: what makes gardening both easier and more fun? Answer: a seed dispenser!
Starting your plants from seed gives you full control of the variety, quality and sowing time, as well as costing less than buying seedlings. Many vegetables grow better from seed sown directly into their final growing place than by raising them in a tray and transplanting (e.g. carrots, beans, sweetcorn, …). Most bought seed comes in packets and needs to be taken from those packets and handled efficiently to get them to the soil site or punnets before ‘activating’ them with water. For small seed, a cheap seed dispenser (around $3 on Ebay, see photo) makes that whole process really simple.
As simple as these 2-piece seed dispensers are, here is some advice about how to use them best.
- Separate the two halves of the dispenser and pour the required seed from the packet into the clear ‘lid’ of the dispenser held upside down.
- Attach the base of the dispenser and turn it over such that no seed falls out (yet).
- Dial up the seed hole size which just allows seed to escape from the chamber.
- Holding the dispenser nearly horizontal, gently tap the chute to create a flow of seed down to the soil or punnet, controlling the amount so that the seed is spread at the right thickness/distance apart (not critical as you can always thin out the plants later).
- Turn the lid to the largest seed hole size and pour the remaining unused seed back into its packet for next time.
For larger seeds, the dispenser can be used simply as a vessel to hold the seed safely while you are going to the planting site, and you can then pick out the seeds with your fingers one by one from the open lid while hand planting. From one packet of seed, you can do successive plantings to spread out the harvest time (rather than buying multiple punnets of seedlings each season), and one packet may last several years. You can save seed from the variety that does best in your garden (provided it is not a special hybrid variety or F1 cross). For example, you could grow a dozen types of tomato year after year without buying a single plant. Problem dispensed!
I have purchased seed dispensers from a variety of online suppliers and the quality of these dispensers has varied greatly. I have now settled on the Ryset mini seeder GD736 which can be purchased from either The Seed Collection or Aussie Gardener.
Synthetic gardening gloves
 Which garden gloves make life better? In my view, gloves are a ‘must’ most of the time but different gloves suit different tasks.
Rubber gloves are waterproof and vary from too thin/tearable to ‘tough’ but lacking feel. Unless flock lined, they can be hard to put on/take off. They also make your hands sweaty and need frequent washing inside to eliminate odours. They are mainly useful where you are working with water or wet soil. Cotton gloves soak up any moisture and get damaged, dirty and worn out quickly, and don’t protect against thorns etc.
Cotton gloves coated with a waterproof layer over the palms or fingers are a nice hybrid but also have some of the same drawbacks, and the coating doesn’t last all that long.
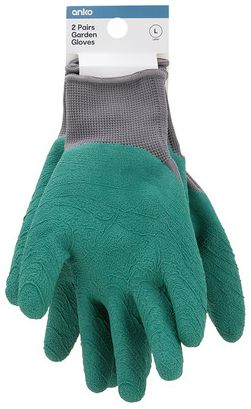
I recently bought coated synthetic gloves at Kmart (see photo) and I find they fulfil nearly all the best features and have few drawbacks. The woven synthetic base material is tough, comfortable, breathable, retains its shape and makes the gloves easy to slide on and off. The coating is rugged, grippy, and comes far enough up your hand to allow you to wash dirt off the outside of the gloves without getting the woven part wet. After some months of constant use, there is little sign of wear, and the whole glove can be washed and dried quickly if need be. They are also cheap (2 pair for $6). They do have a ‘vinegar’ smell to them when new which fades, and I think that this indicates the coating is silicone rubber, a thin but durable material. They are available in both large and medium size. I can now use one pair of gloves for almost every job instead of having several different types ‘on hand’ (LOL) and making frequent changes. If I need bare hands, e.g. for handling seeds, the gloves slip off and on easily without turning them inside out. No more scratches, cuts or dirt stuck under fingernails!