
Newsletter readers’ tips
Tomato watering (from Jennie Ramage, November 29 2023)
 Cut the bottoms out of 2 litre plastic milk containers. Place the containers upside down in a deep hole between the tomato plants, leaving around 5cm above the soil. Pack the soil firmly around the container (not too packed, but not too loose). When mulching, bring the mulch right up to the edge of the container, as well as right up to the stems of the tomatoes. It is best to place this watering system at the same time as planting the tomatoes so that you don’t disturb the roots of the plants. When watering the plants when they are young, water with a handheld sprinkler on the roots of the small plants. As the plants grow and their roots spread, and as summer heats up, fill the 2 litre containers with a handheld hose. The water then slowly seeps out of the inverted pouring hole, encouraging the roots of the tomatoes to grow deep in search of the moisture.
Rats and carnivore urine (from Bruce Plain, November 15 2023)
Some researchers at Harvard Medical School have recently published an article entitled The smell of danger: rats instinctively avoid compound in carnivore urine. Here’s the summary: “Researchers have discovered a single compound found in high concentrations in the urine of carnivores that triggers an instinctual avoidance response in mice and rats. This is the first time that scientists have identified a chemical tag that would let rodents sense carnivores in general from a safe distance.”
Mangelwurzel (from Pauline Webb, November 15 2023)
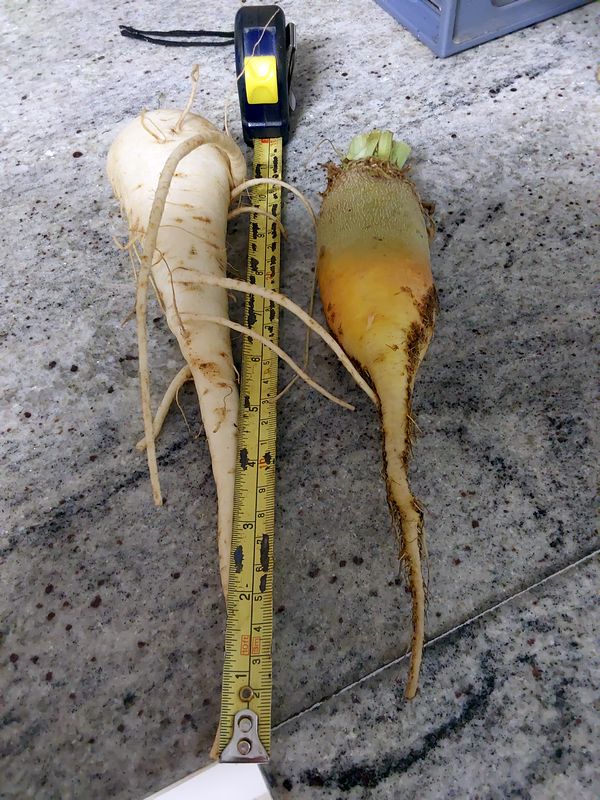 The photo shows two root vegetables. The left hand vegetable is a 28cm parsnip that I (Pauline) recently pulled up. Note that the end broke where it had gone below the loam into clay.
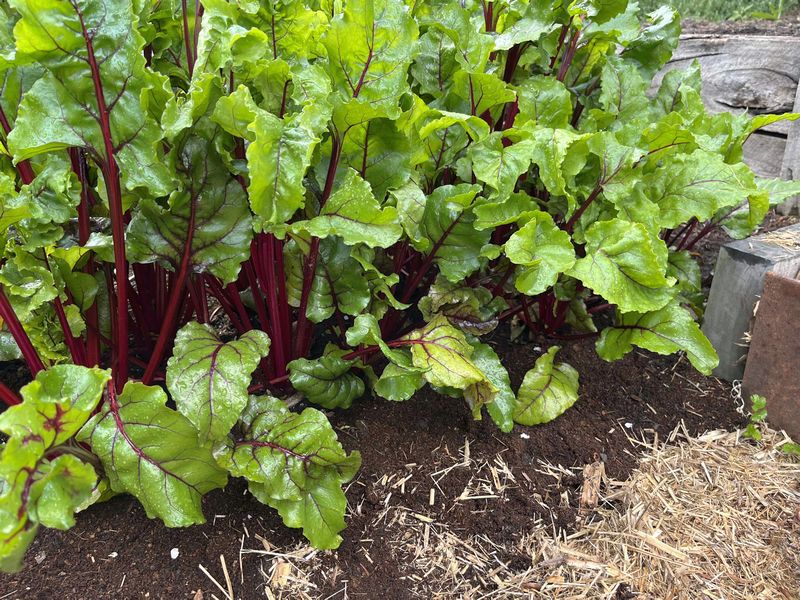
The right hand vegetable is a mangelwurzel [editor: a variety of beetroot]. It is my first mangelwurzel ever. When I heard Jerry (Brisbane) on Gardening Australia talk about them, I was fascinated. I’m sure his grew very large but I am happy with my first attempt.
Resurrecting your broccoli (from Sue Dyet, November 8 2023)
If your broccoli head in the crisper is getting a bit ‘rubbery’, don’t throw it into the compost yet. Just cut 5cm from the stalk, compost that, then put the remaining stalk in water (any glass will do) and put it back in the crisper. It will then ‘stiffen up’. Keep changing the water as you eat it.
Getting a second crop of broad beans (from Pauline Webb, November 8 2023)
When I (Pauline) picked the last of my broad beans last week, I cut the tall plants down to 200mm high. There were already new shoots of 50-80mm hiding in their bases. These shots are now 300mm and with flowers so it looks like I will be getting a second crop. Note that I pick most of my broad beans relatively early and cook them whole. Also note that the stray leggy leaves in the photo are self-seeded parsnips.
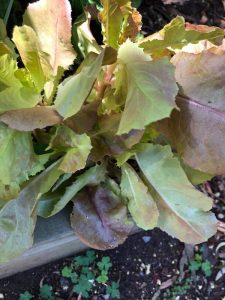 Spent lettuces (from Sue Dyet, November 1 2023)

After you think a lettuce is finished for any reason, don’t pull it out but cut a stump about 5-10 cm long and then cut a cross in the middle/top of the stump about 1cm deep. Then wait for 4 smaller lettuces to appear from the rootstock. The photo right is of 4 mini lettuces about 2 months old that have grown from a single stem.
Worm farming (from Celesta van der Paal, August 9 2023)
I [Celesta] have been inspired by Jian Lui’s enthusiasm for worm farms.
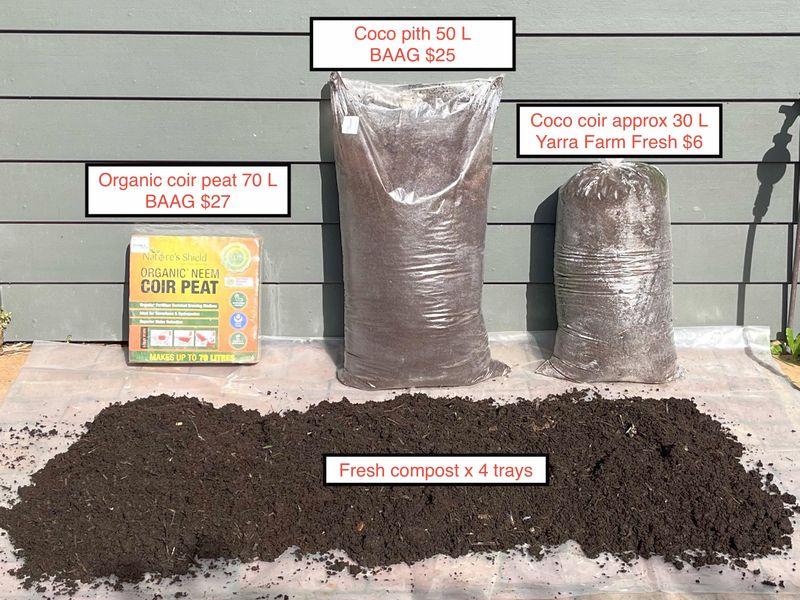 The photo right shows four trays of compost made in only 10 weeks, and that’s during the coldest months of the year. I’ve recycled all my soft food scraps over that time and the only food that has not decomposed are pumpkin seeds.
I had used a Tumbleweed worm factory many years ago, but it was so slow. It worked, but it took six months to make one tray of vermicompost. I have a lot of food scraps and a large garden so I need a constant supply of the good stuff. I had a re-think. I collected more information and took onboard tips from Felicity Gordon and Hannah Maloney’s composting guide in her book The good life, how to grow a better world.
Now I have three worm farms with happy worms that churn through all my soft food scraps every two weeks, creating several trays of sweet fluffy compost every two months.
Here’s what I do.
I prioritise warmth because I want to speed up metabolism. The boxes are placed facing a north easterly aspect, with complete protection from the westerly sun from early afternoon onwards.
I have two green waste bins in my kitchen, one for soft fruit and veggie scraps, and one for tough or solid scraps (e.g. avocado stones, citrus peel, corn cobs). The tough food scraps go in the green bin. The soft scraps get processed for the worm farms. As I consume or prepare food, I chop the soft scraps into small pieces about the size of a 20 cent coin and store them in a small bin. When I have enough scraps to fill a pasta pot, I chuck it in the pot, fill with water and bring to the boil. Immediately I turn off the heat and allow to cool to room temperature. I then spread a layer of soft scraps in each worm farm tray and pour in some of the cooking water. The boiling process softens the scraps just enough to speed up the decomposition process in the trays, and the worms love it. I always add a hand spade of gritty soil with each layer of food. Chopping your food into smaller pieces takes less than a minute to do but it makes a huge difference in accelerating the time that it takes to produce vermicompost.
I always use coconut coir for the tray bedding and I top up with coir as I go.
When to plant brassica seeds (from Wayne Tonissen, January 25 2023)
I [Wayne] I think that timing is the key to a successful veggie garden. My neighbours have just [in January] been planting summer vegetables. They are 8-10 weeks too late and they will be disappointed with results. They can’t now fix that but they can get their winter veggies planted at the right time. That is, very soon: you need to plant cabbage, cauliflower, broccoli, etc by the end of February for best results. When I asked a local nursery for seeds for these recently, they said that they were out of season, no stock. This advice is compounding a common misconception. When I did get some seeds, the packet said ‘plant summer and early autumn’.
A low cost soil conditioner (from Celesta van der Paal, October 19 2022)
I [Celesta] have been cultivating a garden on hard packed sticky yellow clay for the past 20 years and I have removed a lot of rock and stones from my yard in that time. As readers of this newsletter with similar soil will know, we have to provide a lot of soil conditioners to cultivate exotic plants and fruit and vegetables in our gardens. Hence the popularity of raised garden boxes. I have kept my beds in contact with the clay soil, but my vegetable garden is on a slope retained by timber sleepers, so I do add soil and conditioners, but it has been hard work.
Over the last two years I’ve been using bulk amounts of coconut coir to incorporate into the existing soil and to top dress when planting seeds and seedlings. Coconut coir holds moisture which helps to protect and promote seed germination and provides a loose aerated moist base for young seedling roots. Last autumn, I planted parsnip and beetroot seeds directly into a layer of coir with successful germination rates. I then top dressed progressively with great results (see left hand photo). Coconut coir is used in hydroponics in the same way as clay beads as it allows for the ionic exchange of nutrients to plant roots. It is therefore good to incorporate the coir into existing soil to promote nutrient uptake.
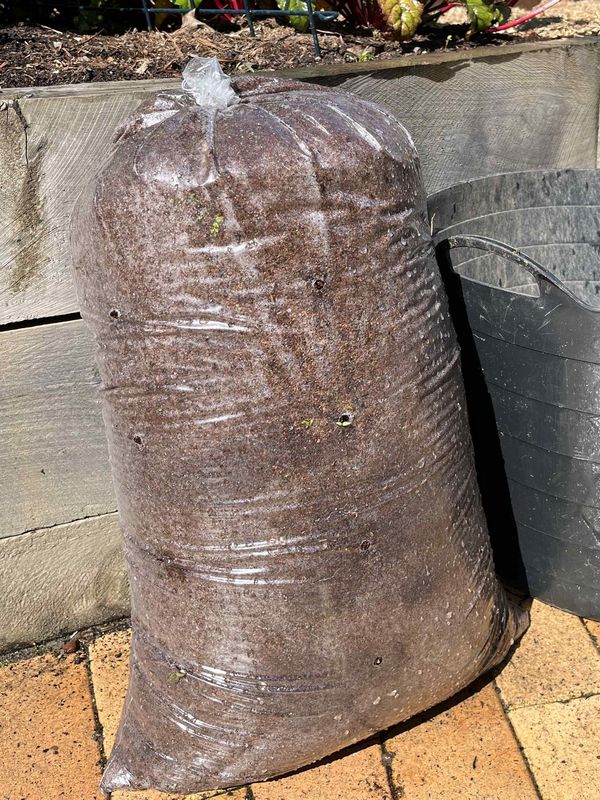
I buy coconut coir in large bags from the Yarra Farm Fresh fruit and vegetable store in Coldstream for $6 per bag (see right hand photo). One bag goes a long way so I find this product to be very economical. Coconut coir performs a similar function to peat moss but at a fraction of the dollar cost and cost to the environment.
In summary, using coconut coir has given me great results in the garden and made my job a lot easier and therefore more enjoyable.
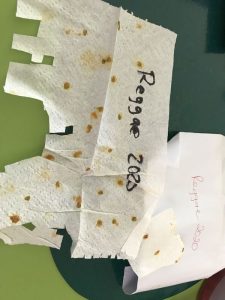
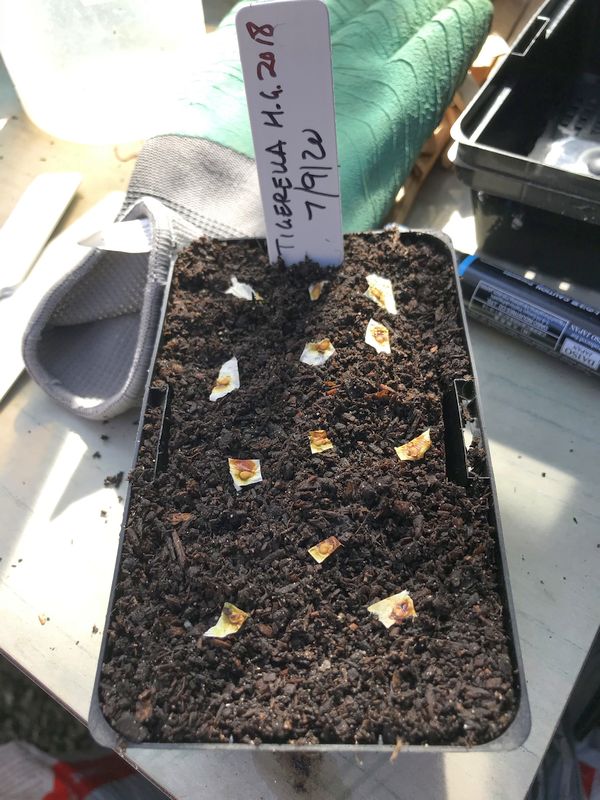
Seed germination on top of paper (from Bruno Tigani, August 10 2022)
 In the commercial vegetable seed industry, the majority of germination tests are done on top of paper. Most of us will be familiar with this method, using cotton or some other similar substrate.
If anyone has any seed of unknown viability, you can approximate soil germination at home by wetting a paper kitchen cloth and placing some seeds on that cloth in an airtight container. For some species, you will see a root emerging within days and, by observing the percentage of seeds that have sent out a root, you can determine the germination percentage of the seeds. Note that, whilst smaller seeds are ok sitting on the paper uncovered, larger seeds like pumpkin or cucumbers may dry out, so another moist cloth on top of the seeds is useful.
In the photo, I am checking on onion seed germination before I sow that seed in a few weeks. I only had serviettes, so not ideal as kitchen cloth is more robust. Onions don’t need any particular warmth to germinate, so these are just on a shelf in my office. For fruiting crops, keeping the container on a warm window ledge for example, will help them along. In this test, after 7 days, about half had emerged. I will check one more time, on day 10 and decide if the seed is good enough to give to growers.
Some tips:
- The cloth just needs to be moist, not wet. I wet the cloth sparingly and let capillary action do the rest.
- Wring the cloth out as much as possible, or use a minimal amount of water, or the seeds may rot.
- If the paper dries during the test, mist sparingly with a sprayer, rather than water drops (which displace the seeds).
- Space them evenly and, when a seed has germinated, I count it and then use tweezers to remove it (or the roots become entangled).
What to do with old shoe laces? (from Sally Warner, June 8 2022)
Like me, do you ever collect your old shoe laces and then wonder what to do with them? Problem solved, they are perfect for tying up climbing vegetables, such as peas or beans, to their frame. They can be re-used many times, plus they are easy to use and undo.
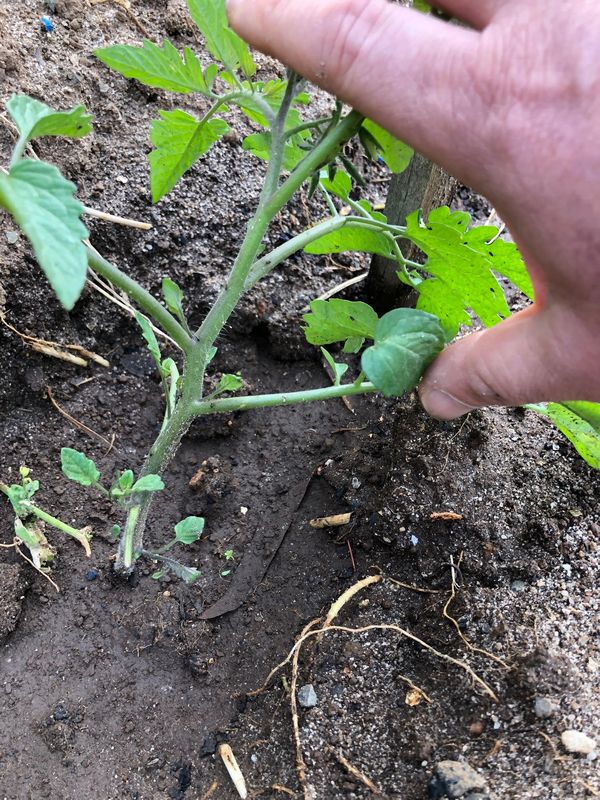
How to prune your tomatoes (from Bruno Tigani, November 24 2021)
On my indeterminate tomatoes, I get rid of all the side shoots and keep to one leader, until the plants reach the top of the pole. This helps with airflow, it’s easier to net the trusses against fruit fly and you can see any pests easier. See the before picture left and the after picture right, with the cut off side shoots at the bottom of the latter.
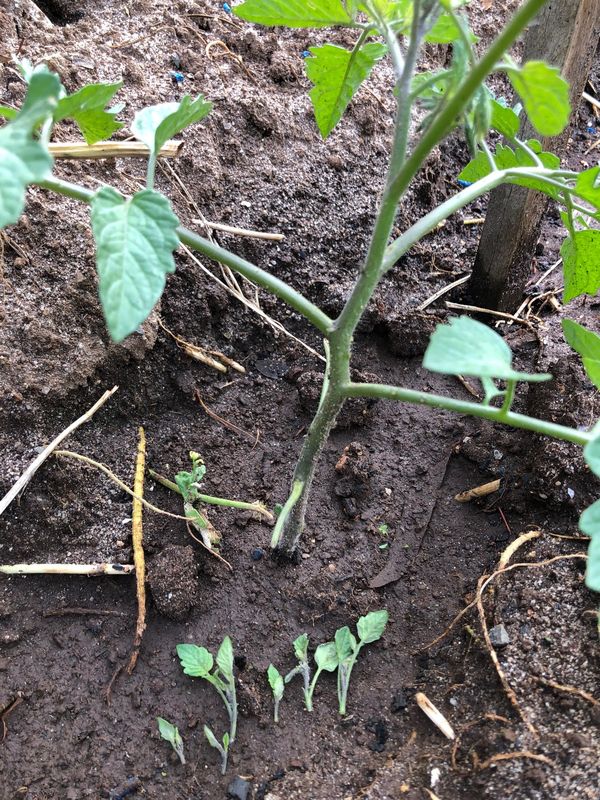
The other bonus is that you can grow full tomato plants from the side shoots. I always grow my second lot of tomatoes from the side shoots, to have a harvest gap.
Say “no” to bitter lettuce (from Simon Boyd, November, 17 2021)What is your go to ingredient for a quick and easy salad in Summer? If you answered ‘lettuce’, you are not alone. In Australia, and probably around the world, lettuce is enjoyed throughout the Summer months as a light, tasty and refreshing vegetable. But did you know that lettuce is really a cool season crop? Whilst we can, and do, grow it all year round, lettuce prefers the cooler seasons and will need to be nurtured during the warmer months. |
A strong sign that your lettuce is struggling in Summer, is a bitter taste. Whilst bitterness is not a bad thing – it stimulates the appetite and digestive juices – if you are not accustomed to the taste, it can be off putting and lead to a crop destined for the compost heap.
Bitter lettuce is generally caused by one of two things:
- Not enough water.
- Too much heat.
So growing lettuce in Summer becomes a challenge as it is generally hot, with little rainfall.
To avoid bitter lettuce, it is essential to ensure that your lettuce crops receive around 25mm of water each week (this is true for most vegetables). If mother nature is not providing this amount of rainfall, you will need to water your crops. Whilst we cannot change the level of heat that we receive during Summer, we can mitigate it by providing our lettuce with shade, particularly from the afternoon sun. Covering with shade cloth, or planting on the Eastern side of a taller growing crop such as tomato, will offer your lettuce some relief from the hot sun. Commercial growers often mist their lettuce crops with water three or four times per day during the height of the Summer to offer a similar cooling effect.
I have also read that one may reduce the level of bitterness in lettuce by popping it in the fridge for a couple of days prior to eating – worth a try!
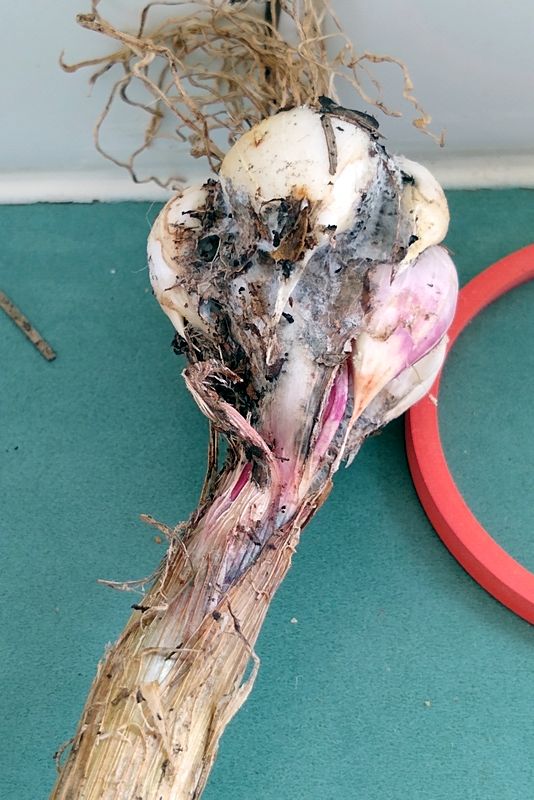
What I am doing with my garlic (from Pam Jenkins, November 17 2021)
My garlic has continued to fall over so I decided to dig it up a little early to save what I could.
Some of the garlics had rotten centres but some usable cloves. I gave the bulbs a good blast with the hose to wash away as much of the fungus as I could before separating out the cloves. Knowing that they weren’t going to keep well, I decided to ferment them. The skin on each clove is still soft but needs to be removed.
After some research, I decided to use this simple recipe. After 3 days, I moved the jar to an external storage area as it really does make the house smell strongly of garlic! After 4 to 6 weeks of fermenting, I will be able to store it in the fridge, where it will keep for months. Fermenting makes the flavour more subtle so, when using it in a recipe, double the suggested quantity of cloves. After using the cloves, the pickling brine can be used in ‘dirty’ cocktails, salad dressings or for making garlic butter.
I am holding the cloves under the brine with the little support ‘table’ found in takeaway pizza boxes. It works really well!
Other garlics had a little black fungus growing on the outside but it hadn’t encroached far between the cloves or got into the centre of the stems. With these, I have decided to ferment some in honey to create a sore throat treatment. Here is a recipe for honey fermented garlic.
The remainder of the garlic will be plaited for long term storage in the cool dry area under the house. Here is Penny Woodward’s instructions on how to plait garlic.
You need to check your plaited garlic regularly to make sure that the cloves aren’t showing signs of sprouting. If they are, and I don’t want to plant them out, then I dehydrate them. The dehydrated garlic rehydrates really well and tastes as strong as fresh. Once it has been dehydrated, it can be left as it is, powdered or stored in oil. Storing in oil has the advantage of being soft and easy to use and you also get a byproduct of garlic-infused oil. When preparing for dehydrating, you need to slice the bulbs so that the water can escape. Remember how many slices per clove as it is easy to put too much into your recipe. Over doing the powder is even more of a risk!
After the material above was published, Carol Woolcock wrote in to express some concern about the risk of botulism from storing garlic in oil. Here is how Pam responded: “I agree that botulism is a risk when preserving in oil. As the Canadian Government says on their website: ‘Botulism bacteria grow in a moist, oxygen-free environment so improperly stored vegetables and herbs in oil can provide ideal conditions for it to multiply and produce the toxin.‘ As CISRO also says, however: ‘Correctly dried vegetables and herbs will not support the growth of food poisoning bacteria … vegetables and herbs to be packed in oil without treatment with vinegar should be dried almost to crispness.‘ That is why I was suggesting that the garlic, which has a high water content, is dehydrated until it is crispy dry before putting into the oil. I also suggest that this method is only used for storing small amounts that you would expect to use within a week or so.”
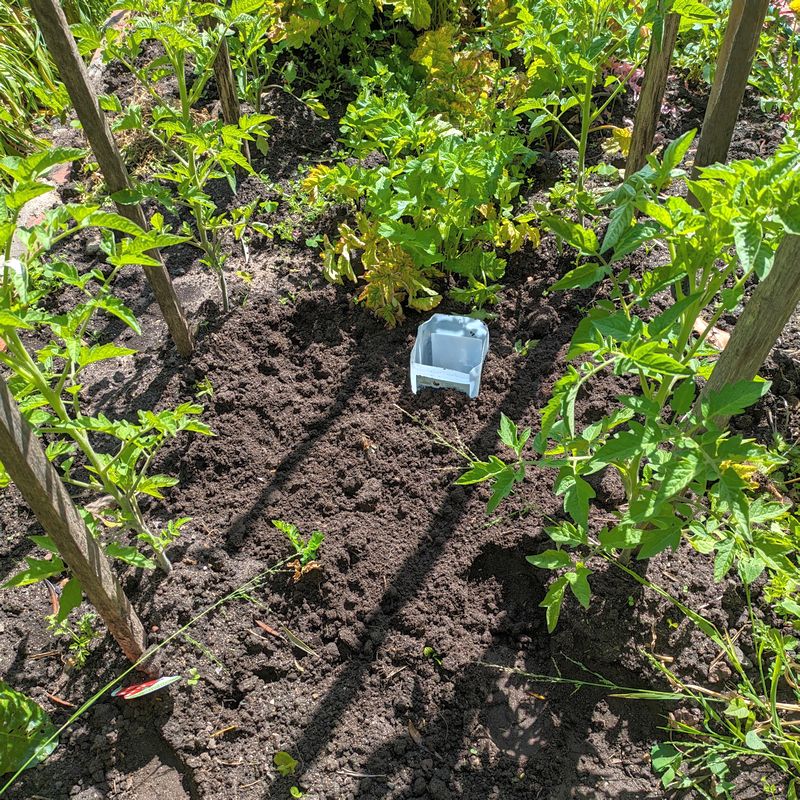
Protecting your peas from cockatoos (from Pam Jenkins, October 27 2021)
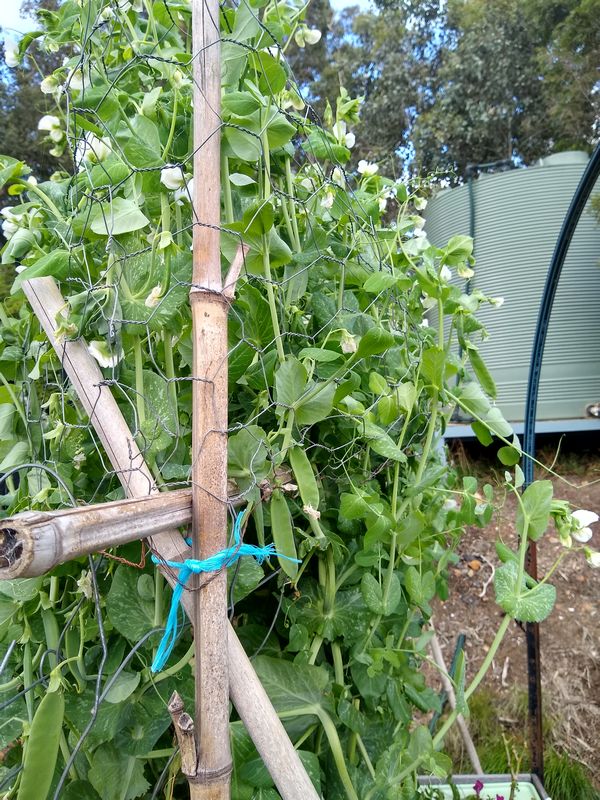 Earlier this year, cockatoos reduced the height of my climbing peas to the size of dwarf peas. My initial response was to cover the peas with nets but the peas continued to grow and started getting tangled in the nets. Then the wind got stronger and the nets started damaging the pea tips so I decided to dispense with them. I hoped that, by then, the cockatoos would have lost interest. But they were back and into mischief within the hour!
So, onto my next solution. Remembering that floppy top fences can keep possums at bay, I wondered if something unstable to land on might keep the cockatoos away. I folded some chicken wire to form a rough tube shape and loosely tied it above the wooden frame supporting my peas (see the photo). Hooray! No problems since then.
Nasturtium flowers and vodka (from Vanessa Reynolds, September 15 2021)
Nasturtium flowers have many uses, and are good to eat straight from the bush. Last summer, I discovered that macerating the flowers in vodka gives you a delicious, and I mean delicious, flavoured vodka which is absolutely delightful mixed with plain soda water. Also, after just a few days, the vodka becomes a lovely pink colour. And the boozy flowers are so yum to eat afterwards, as well!
Planting broad bean seeds (from Evan Gellert, April 21 2021)
A tip with sowing broad beans, especially now that it is getting later/cooler, is to double sow (2 seeds per spot) as seeds are cheap but re-planting into gaps 3-4 weeks from now leaves them even later/cooler. It’s very easy to snip off the doubles that germinate, or just leave them for a while as decoys for the slugs and snails which can destroy entire sowings when there is not much else around to eat.
Pruning herbs over summer (from Robin Gale-Baker, January 6 2021)
To save water over the summer, I’m cutting back my herb border. Pruning off the long stems saves water as these take up a lot during hot weather. There is plenty of soft new growth under the long stems which I will protect with shade cloth for a week or two so that they don’t burn. I will also water every second day for the next couple of weeks but then not much after that.
Taking tomato cuttings (from Penny Smith, November 4 2020)
 I managed to decapitate one of my favourite tomatoes this year leaving me with a top section (luckily not too damaged) and a stem with a side shoot. I popped the top section in a jar of water and within a week it had grown roots. I potted it up and after about 10 days it was ready to go back into the garden. The decapitated stem is also growing well. There is another tomato that is in hot demand from my friends and family but which didn’t germinate well this year and I have run out of seed. So I used the same method to take cuttings of side shoots that developed on the plant. It is a great method to get more plants from the one tomato plant – a good idea if you buy your tomato seedlings. They will be a bit behind your original plant but may end up extending your season a bit. Sadly I only have one image from very early in the process. I wouldn’t pot the cuttings at the stage in the picture but wait a few days longer. The cuttings generally get lots of roots up the stem and I wait until the roots are a couple of centimetres long before potting them up. This process illustrates why you plant tomatoes deep (often up to the first true leaves) – they get adventitious roots up the stem when you bury them (which is what is happening in the water with the cutting) and, once they develop, those roots help to keep the plant stable.
Collapsing garlic (from Pam Jenkins, October 28 2020)
 After the last bout of wet weather, my garlic leaves all collapsed and were laying on the ground. When I checked at ground level and below, I found that they were affected by a fungus. Although it is a bit early to harvest I pulled them out before the fungus destroyed the crop. The worst affected have been dehydrated, the rest are curing but won’t keep long term as the outer skins are not present. If you have heavy soil, take a look and be prepared to act quickly to save your crop.
Fruit tree netting (from Lyn Richards, October 28 2020)
The State Government has decided to ban fruit tree netting with a mesh size of greater than 5mm when stretched on the basis that it can kill or harm wildlife. If you can poke your little finger through the netting, then it is unsafe and will be illegal. The law will come into force roughly a year from now, in September 2021. The Government is also saying that netting should be white to make it easier for nocturnally active animals to see and avoid it at night. See their page on protecting fruit trees and wildlife. Here are some tips for using fruit tree netting:
- Check last year’s cleaned and mended nets before re-using them.
- Cover the tree fully – no attractive branches left out of course – and tautly.
- Stake or otherwise safely hold the net to the ground around the circumference.
[Editor: the State Government suggests that you fix the netting tightly to the tree trunk.] - Check regularly, especially early morning (the RSPCA recommends gardeners check their netting at least twice a day).
- Damage control! Mend any new holes, re-tensioning when it’s windy.
- If a ripening crop is attracting heavy attack from parrots, consider adding a second net thrown over the top and then tied down.
Earwigs and sweetcorn (from Lynn Wallace, September 30 2020)
To prevent earwigs infesting sweetcorn, cut the top and bottom off a plastic milk bottle (3 litre is a good size). Push into the soil so that ?rd of the ‘sleeve’ is underground. Plant the seeds inside. The earwigs cannot climb up the slippery sides. Make sure any trailing leaves do not touch the ground.
 Growing tomatoes from saved seeds (from Stuart Rodda, September 16 2020)

Stuart Rodda has been reflecting on how he grows tomatoes from saved seed and has written the following 10-point plan. In essence, he saves seed by drying the pulp on labelled kitchen paper and then, in Spring, germinates them while still on the paper. He doesn’t think that there is any need to wash or otherwise process the seeds. The method of seed saving described in the first 5 steps should take only a few minutes of your time per tomato variety and makes them easy to plant. Remember to read this 10-point plan again in late Summer, when you are ready to seed-save your tomatoes again!
- In March or April, select a good quality ripe fruit (or more than one) of a variety which worked well for you.
- Take a piece of kitchen paper and, with a felt pen, label it with the variety and year.
- Squeeze some pulp onto the paper and spread the seed out with your fingers or a knife so they are separate from each other.
- Set the paper aside to dry indoors without direct heat in a convenient spot for a week or more.
 Place the dry paper in a labelled paper envelope and store in a jar in a cupboard until the next seed starting season (i.e. August or September).
- In late Winter, using small scissors, cut out the number of individual seeds that you need (still dry and stuck to the paper) and put them in your favourite seed raising mix (punnets, tubes, pots, etc). Because the seed is stuck to a small piece of paper, it is easy to see and handle. Put the unused seed back in the envelope for use next time. If your seed-raising mix has no nutrients then, once the seeds germinate and get to the two-leaf stage, it will be necessary to start watering them with a dilute fertiliser such as Seasol/Powerfeed (one capful in 9 litres of water).
- Keep the punnets in a warm moist spot until the seeds germinate (3-5 days) and then make sure that they get plenty of light as the plants grow.
- Either pot them up into larger containers in the same potting mix or wait until they are 10cm or so in height before planting in the garden. It is best to ‘harden them off’ outdoors for a couple of days before transplanting.
- For garden stakes, I use old galvanised water pipe. They have lasted over 20 years, still going strong, and were free to begin with. There is no need to buy hardwood stakes every couple of years.
- To tie up the plants, I use torn up strips of old pure cotton bed sheets (not synthetic such as cotton/polyester). They are ‘free’ or very cheap from op shops, are kind to the plant stems, and can be composted with the dead plants at the end of the season. One sheet can give you hundreds of plant ties.
 Disposable coffee cups for seed raising (from Nancy Mills, September 16 2020)
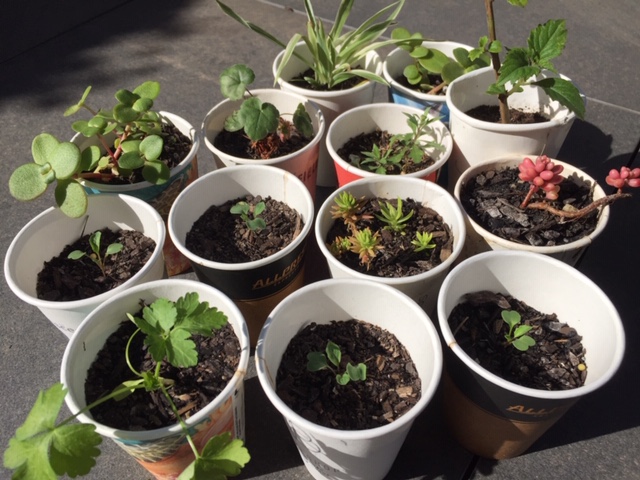
Right now, with many cafes refusing re-usable coffee cups during the pandemic lockdown, here’s a tip for coffee-loving Melburnians. The takeaway coffee cups that you find in just about every cafe make great little pots for growing cuttings and seeds. Remember to poke holes in the bottom first with a screwdriver or scissors to ensure adequate drainage. I mostly use the disposable cups for plants that I’m growing to give away, as they slowly deteriorate.
Yoghurt pots for seed raising (from Lyn Richards, September 9 2020)
Do your kids or grandkids consume yoghurt from small plastic pots? Don’t let them bin those little buckets! They are a perfect size for growing cuttings or seeds; just punch holes in the slightly rounded base. Cleaned after planting out, they also stack neatly for storage till next spring. Or, as suggested by Anna Sanders: cut the pots into strips and use a Sharpie permanent marker to use them as labels for seedlings. To which Penny Smith added: I have found that the Sharpie eventually fades and disappears so if you want a long term label a heavy grey lead pencil is best. I use 6B.
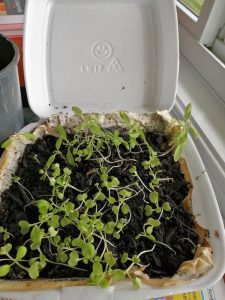 Styrofoam for seed raising (from Pollyn Chan, September 2 2020)

I use takeaway food styrofoam containers to grow my seeds since it’s still cold and they grow well. It’s another way to recycle.
Plastic tubs for seed raising (from Deb Anscombe, August 26 2020)
Plastic tubs make excellent mini hot houses for seed raising. I have 6 varieties of tomatoes in re-used strawberry punnets, with other summer veggies in seed punnets. I prop one end open for ventilation. The tub sits on table in my north facing studio. Works a treat and is great if you’re short on space. 

Water temperature(from Carol Woolcock, August 19 2020)
When watering your punnets of spring seedlings that you have placed in a polyhouse or on a windowsill, use tepid water not cold water straight from the tap. This will provide consistency of temperature and avoid ‘shock’ to the seedlings.
Using rosemary and lavender (from Sam Dixon, August 19 2020)
To protect delicate seedlings from being eaten by pests, I scrunch up handfuls of rosemary and lavender (to release their pungent oils) and scatter them around the veggie patch. It seems to deter snails, slugs and earwigs.
Growing tomato seedlings indoors (from Angelo Eliades, August 19 2020)
Get your tomato seedlings started early by growing them indoors. Sow your tomato seeds in punnets, trays or small pots now. After watering, cover the tops of the containers loosely with some clear plastic to keep the soil moist while allowing some air circulation. Place the covered container on a drip-proof tray and place that on top of the refrigerator or other warm spot. Place your hand there first to check if it feels warm. Somewhere high up near the ceiling also works well, as heat rises and it will be warmer higher up. A warm sunny window is also good. Make sure that you check every few days to see if the seeds have sprouted because, once they have, the cover needs to come off as they need exposure to sunlight. A spot near a sunny window is then ideal. By the time the early spring frosts pass, the seedlings will be stronger and more advanced.
Mustard greens (from Rebecca Donald, August 19 2020)
I have recently discovered how fabulous mustard greens are to grow over Winter, especially if you don’t have a lot of space and not great light. I grow quite a few varieties in pots and move them into the light. I used to think they were too spicy but if you don’t like the wasabi-like heat of them fresh, just stir fry or blanch them and it goes away. They are quick growing and you can just pick leaves as you need. A new variety I’ve tried from Diggers called Tokyo Bekana is awesome because it has virtually no mustard taste but is just as easy to grow and, as a bonus, the flowers are good for adding to salads as well. I think you can grow them year round as well for an easy, constant supply of greens.
Soil in seed trays (from Robin Gale-Baker, August 19 2020)
If planting in seed trays, use a seed raising mix if you can, otherwise potting mix, but not garden soil which compacts around seeds. Fill the trays 3/4 full, firm down the soil, water, sprinkle the seed on the damp firm bed, cover with 1cm soil and water again. Keep the soil damp to prevent small seeds drying out. Use a fine spray from a spray bottle, watering can or hose (heavy watering can wash seeds out). If using old seed trays, scrub out, rinse, then soak for 1 hour in 90% water 10% vinegar (any kind) to kill pathogens in the old soil.
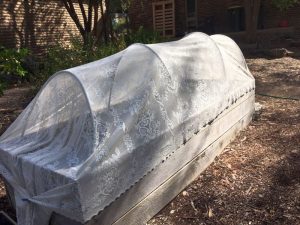 White cabbage moth (from Carol Woolcock, March 16 2019)

If you’re growing brassicas, you’re hopefully aware that the dreaded white cabbage moth tends to ruin any unprotected early crops. What happens is that the moths lay their eggs on the seedlings and the caterpillars then hatch and eat the seedlings. Fine netting can stop the moths from reaching the plants to lay their eggs. Carol Woolcock has sent in a picture of her elegant exclusion net, a recycled curtain from the Op Shop. Usually available for $2 or so.
To which Susan Palmer responded:
Susan is going to try an alternative approach and has purchased some decoy plastic moths from Nillumbik Nursery (see picture right; 6 for $5). The idea is that the 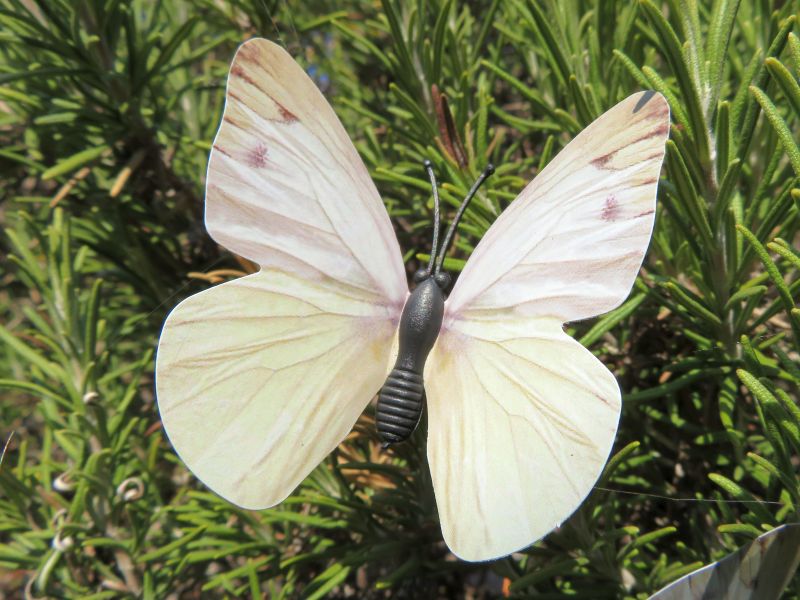 real moths are territorial and will stay away from the decoy moths and therefore also from the brassicas.
To which Liz Hudson responded:
“I use this Word document, which someone shared on Facebook ages ago. I laminated the sheet, cut the butterflies out very carefully, stuck them on top of skewers and dotted them around the garden. I’m ambivalent about their success – but they are a cheaper option than the nursery.“
Leaf, Root & Fruit had previously (March 7 2018) provided an alternative strategy: just wait until late April to plant out seedlings. The white cabbage is a lot less prevalent in the cooler weather and your young seedlings will stand a better chance of surviving.
Summer seedling care (from Fay Loveland, December 12 2018)
Fay Loveland has written in to say that she found the following advice from Green Harvest very helpful: “As the days warm up, we all find it harder to transplant seedlings successfully, particularly tender ones, like lettuce. Don’t be disappointed and waste your efforts; rather, help yourself by:
- Soaking your seedlings for an hour prior to transplanting in a weak seaweed solution.
- Watering the hole before planting and then water the seedling after planting. Many seedlings need watering twice a day for at least a week to help them become established. So the moral is – don’t buy seedlings if you can’t give them care for a week.
- Always transplant late in the afternoon. Cover your seedlings for the first critical few days by using hoops of bamboo or polypipe to support shadecloth.
- In hotter weather, it can help to grow sturdier plants by potting them on into individual pots (e.g. jiffy pots) to reduce transplant shock.
Urine as fertiliser (from Greta Gillies, May 2 2018)
Urine can be used to fertilise food crops in a number of ways. At it simplest, it can be added undiluted to the base of fruit trees. The Veganic Agriculture Network has a sensible and comprehensive article on the uses of urine in the garden.
Strategies for lead contaminated garden soils (from Very Edible Gardens, March 7 2018)
A recent RMIT study found that some Melbourne veggie patches have high levels of lead contamination in the soil. In response, here is an article giving 11 mitigation strategies. In summary:
- Get tested (by The VegeSafe project at Macquarie University).
- Wash. Wash your hands, and wash your vegetables.
- Add organic matter.
- Home test your soil’s pH.
- Add a high-phosphorous fertiliser.
- Mulch.
- Grow fruit crops, not root crops.
- If you have chickens, keep them separate from the soil.
- Use raised beds. Ideally wicking beds.
- Isolate or remove any highly contaminated soil.
- Eat a healthy diet.
The green vegetable bug (from Julie French, February 28 2018)
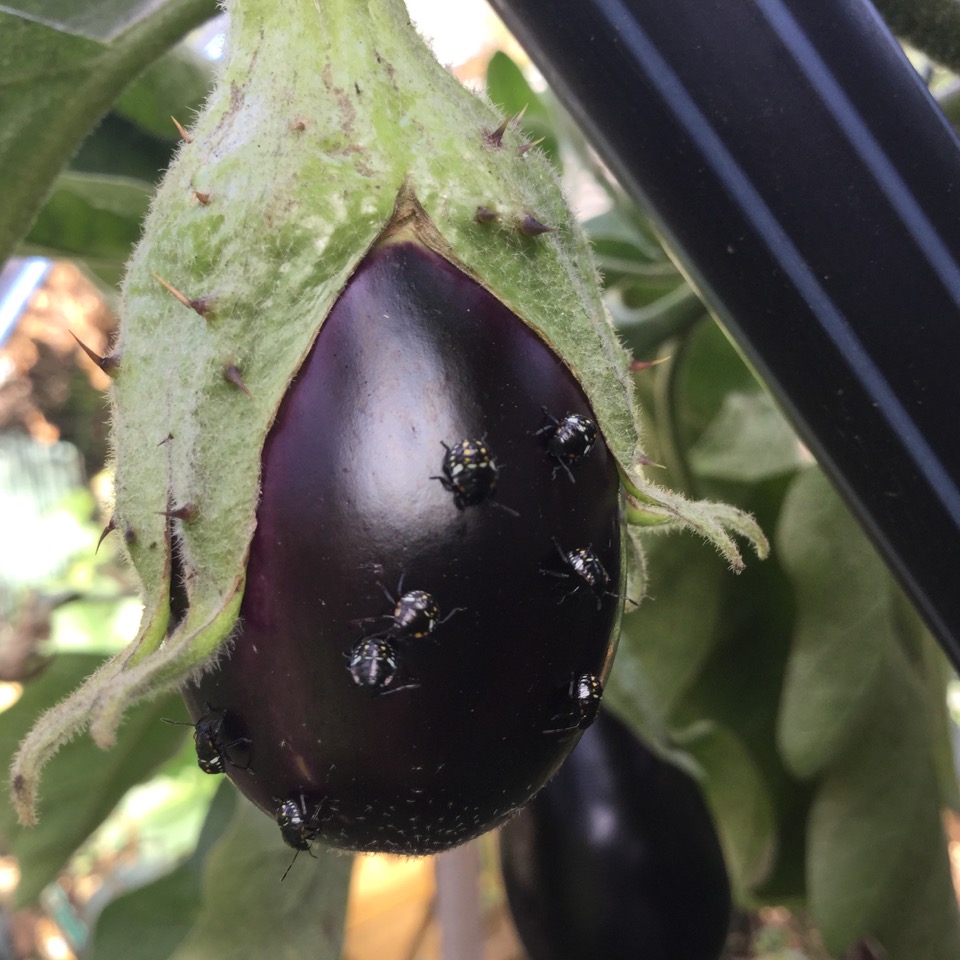 I found these little bugs (see photo) in my garden last year. They were about the size of a ladybird. At the time I couldn’t find out what they were and didn’t follow up as they were only a few and only on the one eggplant. This year they’ve appeared in greater numbers on my beans and I’ve made more of an effort to find out what they are. In Australia, they’re called the green vegetable bug (Nezara viridula) and are pests on tomatoes, eggplants, capsicums, beans and other veggies. The ones in the photo are nymphs; the adults are bigger and can look like green stink bugs (which is what they’re called in the US, I think).
Making jam with less sugar (from My Green Garden, January 31 2018)
Sugar is used in jam for 2 reasons (or maybe 3, if you include taste).
First, sugar acts as the preserving agent for the fruit. It acts to prevent bacteria and other food spoilants from taking hold. The ratio needed for this is at least 75% of the weight of the fruit has to be added as sugar.
Second, the sugar acts to help ‘gel’ the fruit. This happens with the combination of the fruit with its natural pectin, the sugar and acid (from the fruit or added as lemon juice).
So, without enough sugar, the jam might go mouldy and won’t gel, staying very runny.
This is true to an extent but it can be overcome.
To overcome the preserving issue, after making the jam I make sure that I heat-preserve the filled jars. This makes a great vacuum seal on the jars, which means there is no air in the jar. No air = no bacteria.
To make up for lack of a firm set, I cook it a little longer than I normally would with a full sugar jam; and then accept that it will be easier to spread on my breakfast toast than a commercial jam, whose sugar content may be even higher than the 1:1 ratio. So it might be called ‘spreadable fruit’ rather than a true jam.
I have also tried adding a minute amount of Xantham gum powder (available in the health food section of my local supermarket) right at the end of the cooking process, This does firm up the jam, so that it is still spreadable. But don’t overdo it as you might have rock hard jam.
Growing good tomatoes (from My Green Garden, November 8 2017)
As your seedlings get bigger, you need to decide whether to prune out the laterals or leave them to grow. The answer to the question will determine how many tomatoes you end up with (don’t prune = more); the size of the tomatoes (do prune = larger); and whether or not you are prepared to use several stakes for each plant (don’t prune = more supports needed). Also, The laterals pruned out can be rooted in water to create another plant if you need one.
How to dispose of doggy do (from Carol Woolcock, July 19 2017)
Dog owners have an ongoing dilemma of how to dispose of doggy do other than placing it in their council waste bin. I came across a Bokashi product called Ensopet starter. It is supposed to be used with an Ensopet composter (a plastic upturned bucket gizmo) which costs around $70. I achieved the same result by using a 30cm plastic pot with the base removed. I dug a hole about 30cm square and 40cm deep and placed the upturned pot, with the base removed, in it about level with the surrounding ground. Dog poo goes in it and is sprinkled with Ensopet starter. I cover the pot with a heavy stoneware dinner plate. The holes are dug on the uphill side near the drip line on my fruit trees. I have 4 holes at present and simply dig another when they are near full. The ingredients in Ensopet starter include “beneficial microorganisms, wheat, sawdust, zeolite, molasses”. It costs $13 for 1kg and has lasted me for around 6 months. So no dog faeces in my bin, no odour and the fruit trees get a boost.
Some guidelines for storing summer produce (from Duang Tengtrirat, January 4 2017)
Here are a few tips on how to store your summer fruits and vegetables so that they last longer and taste their best. Keep your veggies cool. The fridge is your friend – know how to store your produce.
Rule #1: Keep fruit and veggies separated. Most fruits and berries emit ethylene gas which can cause your vegetables to spoil and change flavour. Keep them in separate drawers if refrigerated.
Rule #2: Bag them first. Loosely bag or wrap greens, broccoli, capsicum, cucumber etc before placing them in the fridge. Keep sweetcorn in its husks until ready to use.
Rule #3: Do not store root vegetables with their greens. The greens will take moisture out of the roots so cut them off first and store them separately.
Rule #4: Remove rubber bands, twisties or any other things that choke your veggies. Store them without any tightening objects for better circulation.
Rule #5: As a rule it is best NOT to wash veggies before storing because extra water creates dampness which is not ideal. (However, washing lettuce, spinach and salad greens makes it easy to use them. So, wash them and make sure to dry them before storing. This will make it easy to make salads and you will eat more of them.)
Where to find finely ground rock dust (from Stuart Rodda, September 14 2016)
An ‘organic’ source of many minerals, including potassium, is finely ground rock dust, particularly basalt rock. There are various suppliers of rock dust-based soil additives, such as Munash, but most of them have other additives to enhance the overall effect and are thus quite expensive (upwards of $2/Kg). If one just wants basalt rock dust, it can be bought at some local garden suppliers, but it is often quite coarse and would take a long time (decades) for the larger grit to break down in the soil and release its nutrients. Thus it is quite important that it is finely ground. I have one source of quite fine basalt rock dust and, while it is dearer (per cubic metre) than a lot of other garden soil additives, it is much cheaper than specially manufactured and packaged ‘rock dusts’. It is from Mercuri Garden and Building Supplies at 2, The Concord, Bundoora, and costs about $105 per cubic metre. This equates to around 10 cents per litre and, because it is quite dense (heavy), this is less than 5 cents per Kg, or thus a tiny fraction of the cost of packaged rock dusts. I am not sure what they would charge for small quantities but, for people like me with larger gardens who buy loose materials by the trailerload, it is a bargain.
Get grass clippings from your neighbours (from Mala Plymin, July 27 2016)
I recently agreed with one of the handymen who was mowing my neighbour’s lawn that he would give me the grass clippings for my compost. He used to take the clippings to landfill so he is now saving time and I am getting to make great compost with the extra grass clippings. Also, one less thing going to landfill.
Plant your seeds in egg shells (from Mala Plymin, July 27 2016)
I now plant my seeds in egg shells, so I no longer have to get small plastic pots. When ready, the seedlings in their egg shells can be planted straight in the garden. The shells biodegrade and provide the soil with calcium. When I crack the eggs, I make sure I do it close to the top.
Eat your pumpkin leaves! (from Karen Olsen, March 9 2016)
When I look at my veggie patch at the moment all I can see is zucchini and pumpkin plants. I often make stuffed zucchini or pumpkin flowers (ricotta and basil: stuff, dress with olive oil, salt & pepper, then bake in the oven until a touch golden). But sometimes there are not so many flowers. So I tried the same thing with young pumpkin leaves (the whole of the plant is supposed to be edible): they were great! And, of course, it made room for some other veggie patch occupants.
Protecting seedlings from both slaters and snails (from Susan Palmer, December 9 2015)
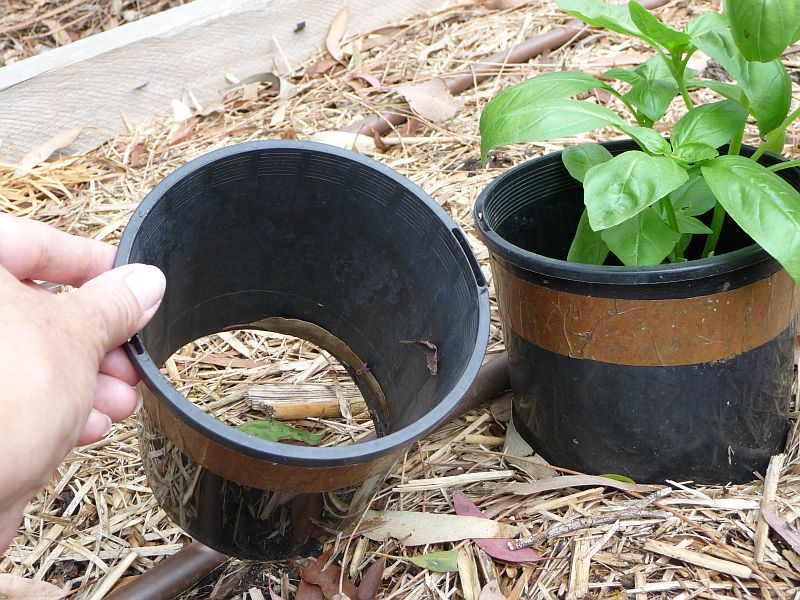 Susan may have found a solution for her quest to limit the damage caused by slaters and snails without killing them. Last year, slaters started chopping down her young veggie seedlings at night, progressively devouring them over the next few days. Really irritating! Following a tip from the ABC website, she now puts plant collars (old pots with the bottom chopped out) on all her seedlings. She also puts copper tape (can be purchased from Bunnings) around the pot to deter snails. Once the seedling is well established, the collar can be removed as the tougher stems are less attractive to slaters. Since then, there has been no slater or snail damage.
Editor’s note: did you know that slaters are effectively land crabs? Or, that their ‘proper’ common name is woodlice? Or, that they are apparently called ‘butcher boys’ in Williamstown?
 To which Evan Gellert responded (in October 2016):
The photo is of a large snail that wasn’t bothered by the copper film tape I fixed to my raised veggie beds around 2 years ago. The copper tape is still in good condition (it can be seen just below the upper plank of the raised bed, with a couple of nails through it). Although it is discoloured and oxidised, the tape still has physical integrity. The snail trail from below makes it pretty clear that the snail passed over the tape, and didn’t simply do a U-turn from inside the veggie bed.
Growing strawberries in a small space (from Elodie, December 2 2015)
 Elodie says she may have found a solution for her quest to grow enough strawberries to be self sufficient without planting out half the garden. She makes strawberry towers (see the picture). Each tower holds around 35 strawberry plants. The large bottom pot is on wheels for obvious reasons but it also makes it hard for the crawling critters to get in, as does the copper tape (it acts as an electric shock barrier). There is a good layer of scoria for drainage in the bottom, with geo fabric in between the soil layer. The middle pot has its bottom cut out, so is really just a retaining wall for the next level. Coir mulch is used to hold back the soil in the pipe holes. A few sticks in the top can support a bird net draped over the whole lot.
Keeping your worms cool (from Fay Loveland, October 7 2015)
This week in the garden I’ve been trying to keep the worm farm cool. As I write this, the worms in my worm farm are enjoying slices of chilled watermelon! To keep the worm farm cool, it is positioned in a shady spot under a large tree. During the past few days, I’ve added a couple of plastic bottles of frozen water (think of a cold version of a hot water bottle). The worms ‘snuggle’ up to the chilly bottles. At night, I open the worm farm lid for a while and rinse the farm with fresh cool water. I have also sprinkled the worm farm with a little lime to keep the pH higher and to reduce odour. Finally, I’ve soaked many layers of old newspaper and laid that over the top of the worms. It might sound like a bit of work, but it’s worth it to keep the worms working, and nobody likes finding stewed worms after a few, hot, neglectful days.
To which Jane Trikojus responded:
Another simple way to get worms through heat waves is to remove the bottom liquid-collecting tray and place the worm farm on the soil. The worms will travel down into the much cooler dirt when necessary and up again to feed. Should be in the shade for summer.
Using food leftovers/scraps and reducing food waste
(from Duang Tengtrirat, December 7 2016)
Some of us enjoy leftovers, others don’t mind them and yet others would do anything to avoid looking at yesterday’s foods. No matter how hard we try there are always leftovers. Worse yet – no matter how organised we are, there are still leftovers and we feel compelled to use them rather than throwing them out. Here are some tips:
1. As soon as you put food into a container to store in the fridge, stick a note ‘EAT ME FIRST’ to it. Then use this first either as a re-heat or a re-purpose.
2. When preparing to put leftovers away, make it easy to use them again. For example, remove cooked chicken from the bone so it’s ready to use.
3. When ready to use leftovers, think of its ‘re-purpose’ use. How can you breathe new life into something from yesterday or the day before?
4. Look around to see what you have in your pantry that can work as ‘supporting casts.’ For example, in your pantry: rice, pasta, wrap; or, in the fridge: cheese, sauces dressings.
(from Carol Woolcock on how to use lemon rinds, December 4 2014)
1. Finely grate the rinds and store in a container in the freezer. Useful when only a teaspoon or so of grated rind is required and you don’t want to grate a fresh lemon (or you don’t have any).
2. Allow the lemon halves to thoroughly dry (in the sun or when you have turned the oven off after cooking). These make great fire lighters (and scent the room as well). I also save any lint from the clothes dryer and stuff the halves with this).
3. Remove the white pith and cut the rind into narrowish strips. Blanche in boiling water for a couple of minutes then drain and place in a sugar syrup over a low heat until semi-transparent. Remove from the syrup and drain on baking paper until dry (may take a couple of days). Can then be used in fruit cakes etc or dipped in melted chocolate for a treat with coffee. A couple of teaspoons of the lemony syrup can also be added to a glass of water (soda, mineral or tap) for a refreshing drink.
4. Dip the halves in a saucer of bicarb soda and use to clean soap scum from the shower door. Depending on how much scum is present, you will need to re-dip the skin. Rinse off with plain water for sparking glass. Farewell to easy off BAM!
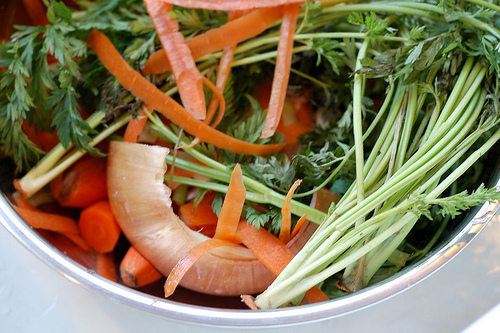 (from Duang Tengtrirat, November 27 2014)
Making vegetable stock from kitchen scraps: I keep almost all part of veggies that I don’t use in a freezer bag and throw it in the freezer to make stock. There are three key ingredients in stock: onion, celery and carrots. The rest you can be creative about and add anything you like.
Veggie scraps that I keep include: onion skins (brown onions only as red onions skins are bitter), garlic peels, coriander roots, green onion roots and green tips, celery tops, mushroom stems, spinach roots and silverbeet stems.
When I have enough in the freezer (2 and more cups), I de-frost them and add water, boil until soft, strain and throw away the solids, keep the broth in the fridge for 2-3 days or freeze the stock for later use. Note: The difference between broth and stock is that broth is spiced and stock is not. I prefer to make stock (no salt and no pepper) so that it is more versatile and add spices like ginger if I am making Asian food, oregano, thyme and sage if making risotto, for example.
Tip: I don’t use brassicas (broccoli, cabbage, brussel sprouts) in making stock because (1) they add a bitter taste and (2) they are too strong and overpower the aroma of the stock.
(from the Little Organic Shop Hurstbridge, November 20 2014)
All our food scraps and veggie/fruit peels etc. go back to the chicken farm that we get our eggs from. Any waste that chooks don’t like or shouldn’t eat (onions, citrus, potato peel, etc.) goes into compost. Leftover milk from the coffee machine is either made into kefir and used in pancakes, scones and other recipes that call for buttermilk or sour cream, or use it to make custard or creamed rice. Vegetables that are misshapen, or that are getting close to use-by (but are still good to eat) we make into soups or sauces or find suitable recipes to use them e.g. one of our farmers recently brought in a lot of rocket that we knew wouldn’t last, so rather than waste it we turned it into a delicious rocket pesto with walnuts.
(from Sammy from Diamond Creek, November 13 2014)
Egg whites, can be frozen. As can egg yolks. In my experience, you then can’t use them in the ‘fussier’ baking recipes, but they are perfectly suitable (once thawed) for the more forgiving baking.
I am told whey can also be frozen, however I have never tried it. I give left over whey to my chooks – they think it’s heaven!
Lemons! My lemon tree is currently a non-producer. We rescued a friends potted lemon tree that was on the point of death due to neglect, no water, little soil and gall wasp like you wouldn’t believe. So, over the last 18 months, we have been giving it a lot of TLC and pinching out any blossom to help it save its energy for growing. Hence, if I see someone with extra lemons, I take them with open arms. But when you take piles of lemons, you have to do something with them.
Freeze the juice in ice cube trays – one cube is roughly half a lemon so it works out fine for measurements. Then I grate the rinds and freeze them also. Both turn out quite fresh and we have very useful lemon all year round.
You can also use scooped out lemon halves as slater traps in the veggie garden.