
Testing the pH of your soil
Stuart Rodda is an avid gardener who lives in Eltham.
What is ph?
We often hear about the importance of soil pH when we are trying to grow plants in our own garden (or even in potting mix or hydroponically). But what is pH, really?
In simple terms, pH is how acidic or alkaline the soil is. Acidity is familiar in things like lemon juice, stomach acid, or even car battery acid, while things which are alkaline such as lime, ammonia or sodium hydroxide (drain or oven cleaner) are also familiar and likewise a bit nasty.
There is a scale of acidity/alkalinity, usually a ‘pH’ number between 0 and 14, in which the lower the number, the more acid is present. A score of 7 on this scale represents neutrality, i.e. no excess of acid or alkali.
In general terms, living things prefer a pH close to neutral (pH=7) rather than an extreme acid or alkaline reading (e.g. a pH of 4 or 9 respectively). Most plants can tolerate a pH between 5 and 8 without too much drama, but each has their own preferred range, e.g. acid-lovers like a pH of 5 to 6 while alkali lovers would prefer a pH above 7.5.
As a scientist, I learned that ‘pH’ is a scientific way of expressing of the amount of hydrogen ions (ion = charged particle) in a certain quantity of water. Strangely, a lower number means more hydrogen ions! I won’t elaborate further on that but just say that there are a number of ways of measuring those hydrogen ions.
How can ph be measured?
For practical purposes in the garden (soil), there are only two ways ways of measuring pH:
- An instrument designed for the purpose, i.e. a pH meter; or
- A coloured dye which changes colour depending on the pH number.
Comparing these two ways in terms of simplicity, cost and accuracy:
| pH Meter | Coloured Dye Kit | |
| Cost | Cheap (less than $10) | Cheapish (around $21) |
| Difficulty | Can be complicated | Simple to perform and read |
| Accuracy | Accurate if done correctly | Very approximate |
| Speed | Rapid (seconds) after soil prep (minutes) | Can take minutes |
| No. of tests | Unlimited | 20+ tests per kit |
 In my opinion, a coloured dye kit is generally better for home use for the non-technical person. But, as discussed later, a cheap pH meter gives a clearer, more accurate result than a dye kit, and is very cheap to use many times over.
You could always use both methods (dye and pH meter) and see how the results compare.
Using a coloured dye kit
Dye kits specific for soil testing are available from Bunnings and include full instructions.
Note that the interpretation of the colour is a bit subjective and can be out by, say, 1 either way.
Using a pH meter
Cheap meters are available online (including delivery to your door) and include instructions but, because pH meters can be used in many applications, the instructions which come with a pH meter are often not 
 sufficient; rather, you need to follow methods specifically for soil pH measurement.
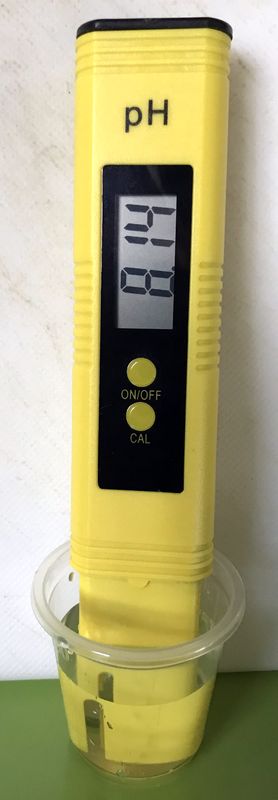
Note that the pH meter with a metal rod attached to a dial (see right hand photo) is, in my experience, almost useless because it is insensitive and hard to get a meaningful reading. Hence I use the yellow ones which look like a fluoro marker pen (see left hand photo)
The following is a general use guide to measuring soil pH with a cheap pH meter (one of the yellow ones which look like a fluoro marker pen):
- Order your pH meter (e.g. from here on Ebay ) and wait for it to be delivered.
- Unpack and make sure everything is there. The package should include some sachets of Calibration Standards (the ‘Standards’) which allow you to check that the meter is working properly. One Standard has a pH of 4 (acidic) and the other has a pH of 7 (neutral) or 9 (alkaline).
- The Standards come as a powder and each one needs to be dissolved in pure water before use. If you live in Melbourne, our tap water is pure enough for this but if your tap water is not pure then you may have to use distilled water, which you can buy in a supermarket.
- Dissolve the whole contents of each of the powders, one at a time, into the stated volume of pure water (probably 250mL) in a clean labelled bottle with a good screw capped lid. A bottle with a plastic lid is best because it won’t corrode. You will then have two bottles of ‘standard solution’, each with its own known pH which you have written on its label. There is enough solution for many calibrations (you might only need to use 10mL each time) sostore the bulk solution frozen so that you can thaw it out and go back to use another sample of it again and again if need be.
- Your little yellow or blue pH meter should have a black cap on one end to protect the glass electrode which does the measuring. It also has a battery which powers the electronics, accessed from the other end. Make sure that the battery is installed correctly and that, when the pH meter is switched on, a number appears on the little LCD screen of the meter.
 Remove the protective black cap from the electrode end and, using a small jar or cup, dip the glass electrode (measuring) end of the meter into 10-20mL of one of the ‘standard solutions’. The depth of immersion needs to be enough to cover the glass electrode. I find that shot glasses (glass or plastic) are about the right size for this job (see photo). The reading on the pH meter screen should now be approximately the number corresponding to the known pH of the Standard, e.g. 4 for the pH 4 standard.
- Rinse the electrode (measuring) end of the pH meter in clean water. (Don’t immerse the whole meter because that would ruin it by letting water come in contact with the battery and electronics).
- You can now immerse the glass electrode end into 10-20mL of the other Standard and confirm that the reading on the screen is approximately the expected number. Remove the pH meter from the second calibration solution and rinse the electrode again in clean water.
If the numbers you saw on the little screen were what was expected (i.e. same as the pH numbers of each Standard), then the pH meter is calibrated and ready for use. A small difference of 0.1 or 0.2 pH units from the expected reading is nothing to worry about.
Preparing a soil sample for pH measurement using a pH meter
See the Agriculture Victoria website.
Your soil may be fairly dry, or it may be wet from either rain or from watering. Because pH can only be measured in water, soils generally need to have water added to them before a pH measurement is done. The following procedure prepares a soil sample for pH measurement by a pH meter.
- Obtain some high quality water (e.g. Melbourne water, fresh rainwater or distilled water from a supermarket).
- Get your pH meter ready to take a measurement.
(a) Sit the electrodes of your pH meter in this water in a beaker or jar so that the electrodes (the bottom 2 cm of the meter) are covered.
(b) When ready to start, turn on your pH meter, then move the meter to a sample of the first Standard solution (e.g. pH 4) to confirm that the reading with the standard solution is correct. Rinse the pH meter electrodes with high quality water. Repeat the check with the second Standard solution (e.g. pH 9).
(c) Leave the electrodes sitting in high quality water in between readings (i.e. keep them wet). - Add a scoop of each sample of your garden soil to a separate labelled jar or bowl.
- Add about 5 times the soil volume of high quality water to each sample.
- Stir or shake each soil/water mixture for up to 1 minute and allow the solids to settle for a few minutes.
- Hold the tip of the pH meter in the water (above the sediment) and wait until the reading on the meter is steady, then note it down for your records. Repeat this measurement procedure for each different sample of soil.
- Rinse the pH meter electrodes with high quality water.
- Re-check the pH meter with the Standard solutions to make sure they are still as expected.
- Rinse the pH meter electrodes (the bottom 2 cm of the meter) with high quality water.
- Turn off the pH meter and replace the cap for storage.
You can do measurements for multiple soil samples in one session, recording the results and where you got each soil sample from. Doing multiple samples in one session reduces the number of times that you will need to check the accuracy of the meter using the Standard solutions.
There are many variations on methods for pH measurement but for home gardeners this simple method will give you a good idea of whether your soil has a pH suitable for a range of plants. If you get an extreme result (such as a pH below 5 or above 8), it may be a good idea to submit a soil sample to a testing lab to confirm the pH before you take any action to remedy the acidity or alkalinity of your soil. Adding compost is one of the gentlest and safest ways of bringing your soil closer to neutral pH which will suit the widest range of plants. Adding lime to raise the pH or sulphur to lower the pH of soil may result in overshooting, i.e. making the soil too alkaline or acid, so always err on the side of adding too little of these acid or alkaline agents rather than too much. You can always re-check the pH a few days after adding any soil amendment.
Many thanks for an informative article Stuart – I purchased the pH meter you recommended and was just amazed at the quality and price!
Also how compact it was, compared to the old Jones Model B meter with its wooden case that was the first meter I once used (I guess that was also the first meter you used!). And just the glass electrode would have cost many times the price of this meter.
So much easier than trying to guess the colour of the indicator in the coloured dye kits.