
No dig gardening
Marina Bistrin is an avid gardener. In May 2016, she ran a workshop at St Johns Riverside Community Garden on the subject of no-dig gardening. Here are her notes.
No-dig gardening was developed by Esther Dean in Australia – by sheet mulching and laying down layers of materials that decompose to make new soil. This is an easy and cheap way of growing plants over lawn (grass) or weeds – no digging is involved. It also uses waste products – rather than going into landfill or recycling (which involves extra energy expenditure and expense).
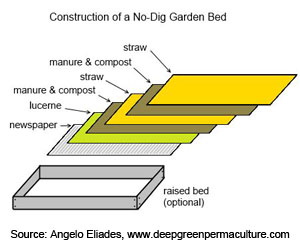 The area is sheet mulched (usually with cardboard or newspaper) so that the grass and weeds underneath the mulch die (and are then, over time, incorporated into new soil being produced). The sheet mulch is usually covered with thin lasagne-like layers of straw, manure and green garden waste (depending on what you have available) or you can plant straight into prime garden soil. If you don’t have these, the process can be started with a thick layer of wood mulch which you can often get for free. Another way to sheet mulch is with thick plastic sheets, carpet or other materials which are later removed (after the plants underneath have died).
Melbourne subsoil is usually very hard to dig, as it is mostly clay. One benefit of no-dig gardening that people often don’t realise is that the decayed weeds and roots under the sheet mulch create compost and tunnels for air and water to circulate in the clay as well as worms, micro-organisms and other living soil helpers. This method does not use poison, so the food that you grow will be safer to eat and it will also not poison the worms and other small creatures that are great garden helpers. If you put lots of composted material into your garden soil, you will not need to use artificial fertiliser or to water your garden so much. Good fertile soil is moist, crumbly, alive with worms, lots of tiny creatures, bacteria and fungal hyphae.
No dig basics
- Put down cardboard or newspaper over weeds to exclude light (most important).
- Lay down mulch, or preferably a mix of compost, manure etc to hold down cardboard & exclude light, but can be wood mulch which is slow to decompose.
- Water below sheet mulch & above it, to aid decomposition & to weight it down.
- May need to lay down an edge to hold cardboard down.
- Optional; plant cover crop or green manure into top layer.
- Optional; plant vegetable seeds into small mounds of soil onto top layer.
- Can mulch over the top of this with straw or other mulch.
Exclude light
To kill the weeds and lawn you need to exclude light. You can do this by putting cardboard or at least 6 layers of newspaper (wet newspaper is best) on top and making sure there is about 6 inches (15cm) or more, overlap with the cardboard or paper you lay down on the ground. This cardboard also needs to extend well over the edge of your garden (15cm at least) until the weeds underneath have died (it may take from 2 to 6 months, but don’t be tempted to dig under and check). Unfortunately this can look messy, but it is easy and practical. It is a good idea to lay something down over the edge of the cardboard such as long pieces of flat wood (e.g. ‘sleepers’ or wood ‘palings’ from old garden fences, or bricks or tiles to keep the edge down in place and to discourage unwanted grass and weeds from growing back into your garden bed from the outside.
Weigh cardboard down and water in
Watering will weigh newspaper and cardboard down – also check that the soil below the sheet-mulch is moist as you want the plants to rot rather than dry out. As soon as you lay the cardboard down, it needs to be held in place to exclude light and needs to be weighed down by at least 8cm depth (or preferably more) of something that will become soil (such as wood mulch, which is the cheap, and sometimes free). Preferred things to add are things that will rot down quickly to become soil, such as animal manure, hay, straw, garden waste such as lawn clippings or prunings (make sure there are no weeds or weed seeds in it, and that any branches are cut small enough that they will not grow into new plants), and of course you can use compost or good soil too. A mixture of things is good. It will then rot down and be ready to grow vegetables in about 4-6 months. If you want to plant something straight away, you can plant it into little mounds of soil or compost (about 2 handfuls). Scattering some pure sand (if available) is good for drainage and to make the soil more friable. Water it in.
Beware of using fresh, un-composted horse manure as it has grass seeds in it. Compost it separately, or lay it down under the sheet-mulch layer to speed up the decomposition of the weeds it contacts.
Lay your cardboard down carefully
Beware: if any light comes through the cardboard layer, for instance if the wind blows it or the edges bend up then they get dry, your weeds will grow through the gaps and your effort will be wasted, so be vigilant about checking regularly that nothing is growing around the edges on in between the bits of cardboard, and that you have enough mulch and moisture to hold the cardboard down firmly. You will need to pull out any weeds that grow through, and may need to put on more cardboard if your first effort was not done carefully enough.
Difficult weeds
The most difficult weeds to kill are the grasses that have long thick roots that travel sideways under the ground (stolons), for example buffalo or couch grass. These roots store food and moisture, so the grass can live a long time without sun, without water, and also can grow sideways for metres under and through any gaps in your cardboard and especially around the edges of your garden bed. I suggest you make an extra wide sheet-mulch, to incorporate a barrier path covered with wood-mulch, as a border between any lawn that is outside your no-dig garden bed to help keep these weeds out.
Cover crops and green manure
It is important to cover the soil with cover crops, green manure or plants, to start something growing as soon as possible – it helps your soil establish it’s own eco-system quickly and also holds the sheet-mulch in place. They will become heavy as they grow and they also compete with weed seeds that have blown in. These plants are called cover crops (as they cover the ground) or green manure (if they are chopped down and can be dug in to the soil before they set seed). The plants that I prefer to use for this are in the pea and bean family (legumes). Legumes have a symbiotic relationship with nitrogen-fixing bacteria in their root nodules that convert atmospheric nitrogen to a water-soluble form available to plants. Nitrogen is used by plants to make protein. As you don’t need to grow these plants to maturity, feel free to plant them any time of year. They only need to grow a little while and, when they die, they will become compost and contribute to the richness of your soil. You can also grow your own pea-straw.
Check no weeds are growing through the sheet-mulch regularly
When you first make this garden, before you are sure the weeds are all killed below the sheet-mulch layer, it is important to check it every week and see if any weeds have come through. If they have poked through, push aside your mulch layer and sheet-mulch, pull out the weed, recover with extra cardboard and put the compost/mulch back again. If you don’t kill these persistent weeds, they will grow even better than last time.
Check no weeds have grown from seed blown into the garden
The other thing you need to do is check if weeds have grown that have blown in from the air. Learn to identify what are weeds and what are the seeds you have planted yourself. You will have to occasionally pull out what is growing, but do it as soon as they have started growing rather than once their roots have grown down through the mulch layer. Note that some edible weeds (such as chick weed, cleavers, mallow and nettles) are useful as temporary cover crops, and they are easy to remove and to compost.
Buying seeds cheaply
My favourite plants for cover crops are bought in bulk from food or livestock grain merchants – broad beans (‘ful’ in Arabic), soup peas from Coles stores, fenugreek and coriander seeds from Indian shops, lupins (‘lupini’ from Arabic and Italian shops), any beans, lentils and peas. Other cover crops are warrigal greens (New Zealand Spinach) and sweet potatoes. I also scatter companion plant and herb seeds as cover crops such as calendula, parsley, bronze fennel, coriander and alyssum. It doesn’t matter if it looks messy – the first 6 months or so, you are only making soil and making sure light excluded from the weeds below – after that, you can plan your garden in organised beds and rows if you like.
Paths as mulch / compost / water reservoirs
It you make paths through your garden, chunky wood mulch is good, as this will help stop weeds from growing on bare soil and eventually compost down to become soil.
Other things you can use for paths are sawdust (that is from clean wood that hasn’t had poison applied), hay or straw, wood planks, bricks, tiles and also short cover crops (such as clover). You could make stepping stones instead from sawn sections of tree trunk, fence palings or even from folded up newspapers. Consider raising the path level above that of your garden beds in summer, to act as a water reservoir.
If you have dips in your clay soil, you could incorporate that in your no dig garden as a water reservoir – moisture loving plants would do well thre and this variation helps to create different micro-climates.
Please share your knowledge. You can also organise classes for your friends or organise classes from local experts. Useful classes could be: weed identification & edible weeds; composting (including weeds); green manure & cover crops; seed saving & sharing; and what to grow through the different seasons in Melbourne.
Useful links
- Angelo Eliades on no dig gardening: https://deepgreenpermaculture.com/diy-instructions/no-dig-gardening/.
- Sustainable Gardening Australia on no dig gardening: www.sgaonline.org.au/no-dig-vegie-gardens.
- Explanation and history of no-dig gardening: www.sgaonline.org.au/pdfs/factsheets/no%20dig.pdf.
- No till gardening / Manasobu Fukuoka method: https://en.wikipedia.org/wiki/Masanobu_Fukuoka.
- Compost: www.burkesbackyard.com.au/factsheets/Gardening-Tips-Books-Techniques-and-Tools/Making-compost/6077.
I have, mostly, buffalo grass and want to create a no dig garden. I like what Angelo Eliades says about no dig gardening but I am concerned that the thick mattered grass (with runners) I have will not be subdued without having to be dug out because its roots and runners are strong and, I think, aggressive. Can I be confident and successful doing this layering method on top of the grass without having to use strong back bone? I am 65 years of age.
Jennifer
Hi Jennifer, hope you don’t mind, but i think there is no short answer to this – so here’s my long answer and a ‘how to’ do it from my perspective.
I prefer to do no digs whenever there is invasive grass to contend with such as buffalo, kikuyu, couch etc because, so long as you build the beds with good overlap of sheet-mulch and wide edged paths/ exclusion zones, they work well. When you do try to dig out these invasive runner grasses, it is impossible to get it all out, as any little bit of stem grows, so you will keep pulling it out for years – from under all your veggies!. If you do make a no dig garden, it is common for grass to re-invade from the edges in towards your veggie patch. You always need to keep a vigilant eye out to stop this re-invasion, so no rest for you either way!
In my latest veggie patch where I rent, I just had a benign lawn grass that didn’t have runners, so I did not have to content with spreading buffalo, kikuyu etc. I’ve recently helped with a no dig bed at St John’s Riverside community garden in Heidelberg, where they have two long no-dig beds along the tennis court fence and have runner grasses to contend with. They had to deal with re-invasion of the no dig beds by these grasses and also into raised beds in other parts of the garden – they have done cardboard/paper sheet-mulching over a lot of the garden area since, and topped it with wood mulch, which seems to keep the grass reasonably contained.
I prefer cardboard or paper rather than carpet for the sheet-mulching, as the paper products decompose relatively quickly and become part of the soil. An option in summer is to put black plastic over the grass in the hot weather to solarise/’cook’ the grass and then to remove the plastic and plant. I read that Morag Gamble puts the composting layers under the sheet-mulch, which also makes sense, as the rotting manure/straw layers will also help the runner grasses to rot/compost more quickly. You know the saying – a rotten apple spoils the (whole) barrel.
If you construct a sheet-mulch no-dig garden, I suggest that you don’t use hay or raw horse manure over your sheet-mulch layer because they typically contain viable grass seeds. Instead, try straw, cow manure or other manures that don’t have grass seeds, or hot-compost the horse manure before you use it. As an interim measure, if you can’t find enough straw, manure etc for the layers above the sheet-mulch (and they can be expensive), a thick wood-mulch layer over the sheet-mulch is fine to start off the process of killing the grass and weeds.
I suggest you make a wide path – an exclusion zone of wood mulch over sheet-mulch – to deter the runner grasses. These grasses can grow for metres underground. Ideally, make your veggie bed and the outside paths at the same time, adding around 1 metre of path around the edge if you have room to do so. I suggest that you cover the paths with at least 6cm of mulch of some sort – wood mulch is great for this and cheap and often free. It needs to be deep enough to hold the cardboard in place so it doesn’t shift about and tear when you walk on it, and to stop light getting down through the sheet-mulch layer to the soil and grasses. Excluding light from the plants below the sheet-mulch layer is vital.
A wide overlap of sheet-mulch is important to exclude light – say, 12-15cm. Cardboard from furniture/ whitegoods stores is ideal for this – it’s very fiddly working with small pieces and the overlap sometimes uses up most of your cardboard! Generally, you have to bring in much more cardboard and newspaper than you thought you would need.
You will need to patrol these edges regularly to check or grass invasion! It’s still better than digging the whole veggie patch though.
With no-dig beds, I love how the invasive grasses and nutritious weeds decompose and become compost under the sheet-mulch layer. However, it can take a long time – I’m guessing 6 months to a year – till you can confidently dig into the sheet-mulch layer and know that the invasive grasses will have died, so be patient and only expect plants to grow in the shallow soil you have created or imported above the sheet mulch. I usually plant in a green manure crop immediately after I have set up the garden to ‘set’ the soil and keep the sheet-mulch in place. Fenugreek is ideal for this – small seeds and plants and they can be bought cheaply from any Indian store. But planting just about anything is a good idea – just to give the garden a good start. Next Spring or Summer, you can give proper thought to what you want to plant and where.
Good luck – hope it’s relatively easy for you. My advice to everyone is to make sure your edges and overlap are adequate! That’s how most no-digs fail.
Great reply! I’ve been no-digging for a couple of years over kikuyu and am only now having to do a bit of weeding only where runners have taken hold under a shrub and taken off. Vigilance is required but the reduction in the amount of weeding has been astounding.