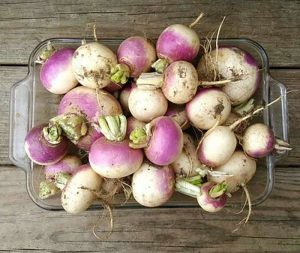
The under-rated turnip!
Robin Gale-Baker, from Sustainable Macleod, discusses growing turnips. This is one of a series of articles she has written about growing various veggies (see right hand sidebar). She has also written a number of articles about growing various herbs, growing various fruit trees and general growing techniques.
 Turnip roots can be eaten: raw, either grated into a coleslaw or sliced for a salad or cut into fingers for dips; roasted, steamed or boiled as an individual veggie; or used in stir fries, stews and soup and as mash. The leaves can be cooked as a green vegetable or, when young, used raw in pesto as a substitute for sweet basil.
Taste
Small turnips, harvestable in 6-7 weeks, taste sweet with a slight spicy undertone. More mature turnips, which are harvested at about the 8-10 week mark, are more peppery and slightly bitter. They have quite a bite to them. Not everyone likes turnips. For some people, they are delicious, while others find them not to their taste.
Colour
In colour, most turnips have white flesh but their skins, which are also white, develop a blush of red, purple or green where they emerge from the soil and are struck by the sun. This can be an attractive quality on the plate if unpeeled.
Varieties
Diggers sell turnip ‘Purple Top’ which is an American heirloom variety and turnip ‘Mini White’ which, as the name suggests, is eaten small, maturing in seven weeks.
Yates sell ‘Japanese’ turnip, turnip ‘Hakurai’ and ‘White Mini’ plus an heirloom mix which includes turnips with a range of colour from white to yellow to red to purple.
Site and soil preparation
Choose a sunny spot with well drained soil.
The soil needs to be prepared to a fine tilth (light and fluffy and free of debris) and just a bit deeper than the depth to which the turnip will grow. Do not add manure as this will cause the roots to split and fork. At most, add some well-matured compost and dig it in some weeks before planting.
Turnips grow well in both the ground and wicking beds.
Sowing and harvesting
Direct sow seed into rows about 1cm deep. Sprinkle seed at intervals of about 9cm, cover with soil and water well. It will take around two weeks for seed to germinate and, at that stage, thin the plants out to 9cm intervals if necessary. At the six week mark, pull several to check for size and harvest readiness. As turnips grow bigger, the tops will emerge from the soil, giving you a fair idea of their size when pulled. Every few weeks, succession sow so that you have a constant supply.
Watering
Water well and keep the moisture up as root vegetables thrive in moist, well drained soil. In moist soil, the root will not fork.
Pests
As members of the brassica family (cabbage, cauliflower, broccoli, etc), turnips are subject to the same pests. Leaves can be eaten by caterpillars, various aphids and whitefly, whilst the roots can be attacked by root maggots.
To protect the leaves, spray top and underside with Dipel, an organic bacterium sold by Yates as ‘Nature’s Way’, when they are two weeks old and then immediately net the rows. You may be able to buy small hoops that can be used to support the net. Transfer some ladybirds inside the net if you can, to polish off any aphids that appear.
The root maggot (also known as cabbage or turnip fly) is the size of a house fly. Its maggots attack roots, causing significant damage and often death of the plant. It is good to rotate crops to avoid such problems.
When plants are young, slugs can destroy plants. Either locate them up by torchlight at night and pick them up and dispose of them or set up beer traps which they are attracted to and in which they will drown, or put out snail bait. Sugar cane straw is also a deterrent as slugs, and also snails, don’t like to crawl across it.
