Growing celeriac
Robin Gale-Baker, from Sustainable Macleod, discusses growing celeriac. This is one of a series of articles she has written about growing various veggies (see right hand sidebar). She has also written a number of articles about growing various herbs, growing various fruit trees and general growing techniques.
 What is celeriac?
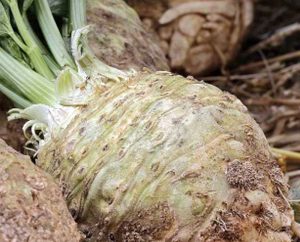
Celeriac is the bulbous root of a variety of celery. It is often described as ugly as it is rough and knobbly on the surface but, when peeled, this gives away to crisp flesh similar in colour to parsnip. Short celery fronds top the bulb.
How to grow celeriac
Celeriac has the tiniest of seeds which need to be sown in punnets. They germinate in light so don’t cover them with soil. They are slow to germinate, taking 3–6 weeks, and, because the seeds are so tiny, they will come up thickly and need transplanting into small pots or cell trays. Celeriac is also slow to grow so plant early in spring (after the frosts have passed) for mid-autumn harvesting. Seedlings should be about 10cm tall before planting out. The very young seedlings resemble those of young flat-leaf parsley.
Celeriac requires a sunny spot but can tolerate partial shade. Plant in well drained, moist soil that is rich in organic matter which will hold moisture. Celeriac requires soil with a pH of 6–7. Halfway through the 4 month season, compost around the roots as it is a heavy feeder. Celeriac can also be grown in trenches and the soil hilled up over the bulb as it grows. Water deeply twice-weekly. Spacing widely is important because the bulbs are exceptionally large for a vegetable. Space them 40–50cm apart in rows also 40–50cm apart.
Bad companion plants include sweetcorn, cucumber and pumpkin so avoid planting celeriac within 2 metres of these.
For a long time after planting, nothing will appear to happen other than top growth but come late summer (or early autumn) the bulb will suddenly begin to swell and rapidly expand to the size of a small melon. The bulbs can be harvested, or left in the ground as long as the bed is kept free of slugs and snails. Celeriac can be stored with some of its soil attached to the bulb in a dry, dark well-ventilated shed or garage until needed.
Pests common to celeriac
Pests to watch for include aphids, which can introduce celery mosaic virus. Keep weed free and wash aphids away by hosing. Also problematic are cutworms and slugs (which can eat young seedlings) and carrot rust fly (which can kill the plants). Early and late blight which appear as slightly different brown spots on the leaves are the main diseases.
How to use celeriac
Celeriac has a unique and delicious taste. It is nutty, and somewhat parsnip-like with a subtle tang of celery and a silky texture. Celeriac mash is probably the best known dish but others include cubes roasted with olive oil and thyme, potato and celeriac gratin, celeriac soup and celeriac ice cream. Google for an array of interesting recipes.

I have celeriac growing everywhere. I think it must have originated from the local packet of ‘celery’ seeds I bought. If you’re in a frost free area I recommend letting a few flower and you’ll have a never-ending supply.
First time celeriac grower here. I would like to know if it can be grown from planting the bulb in soil, will it sprout leaves? Thank you.
Hi Jazzy,
Sorry not to reply earlier.
I don’t know for sure but I don’t think that you can grow celeriac from the root. Most people grow it from seed and a few grow it from cuttings (e.g. see https://gardeniaorganic.com/grow-celeriac-from-cuttings/).
Guy
I germinate my celeriac seeds by laying them out on a paper towel and misting with water and leaving the moist paper towel with the seeds in a zip lock bag until roots appear. I’m about to transplant my seeds into soil now! Tweezers will be needed.
I’ll give this ago as celeriac seeds are quite tiny and fiddly.
Great information, thank you! The seeds are tiny! The supplier recommends soaking seeds before sowing so I have and am using a popstick to fish the seeds out of a shot glass that I used for this purpose lol. I’m attempting to grow in a semi arid area so fingers crossed.
Remember – lots of rich compost, deep water twice weekly and fertiliser then the ‘arid’ should be less of an issue.